阿里云服务器上构建基于PoA的以太坊私有链
- allinweb3
- 发布于 2025-11-13 09:12
- 阅读 1224
阿里云服务器上构建基于PoA的以太坊私有链
一、环境
| 服务器 | 系统 | CPU | 内存 | 存储 |
|---|---|---|---|---|
| 阿里云服务器(虚拟机) | Linux | 2 vCPU | 2GB | 云盘 40 GB |
二、以太坊客户端
以太坊客户端是运行在以太坊网络上的软件程序,用于实现以下核心功能:
- 区块链同步:下载并维护完整的以太坊区块链数据,实时更新最新的区块和交易信息
- 交易验证:检查交易的有效性(签名、余额等),确保交易符合智能合约逻辑
- 共识参与:作为节点参与共识机制(PoS),验证新区块的生成和网络状态
- 通信功能:与其他节点建立P2P连接,传播交易和区块信息
- API服务:提供JSON-RPC接口与外部交互,支持DApp开发和钱包集成
在工作量证明(PoW)时代,一个节点软件(比如大家熟知的Geth)几乎包揽了所有工作,足以运行一个完整的以太坊节点。但在 2022 年以太坊合并(The Merge)后,将原有的PoW链与一条全新的PoS链(即信标链,Beacon Chain)合并在了一起:
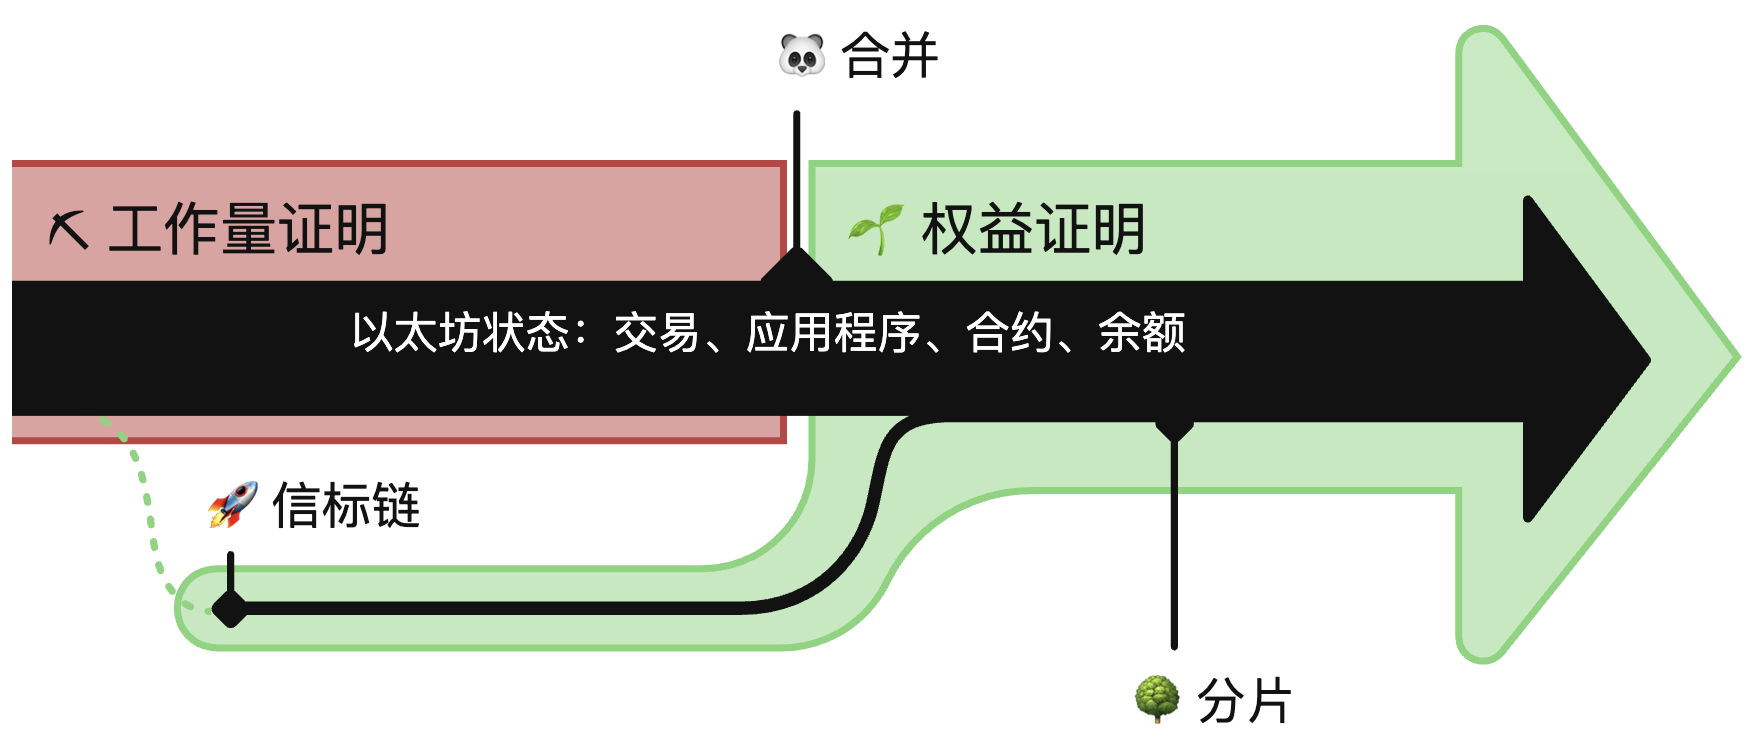
自此以太坊网络从 PoW 转向 PoS。权益证明时代,由于共识逻辑由称为共识客户端的单独软件实现,故而一个以太坊节点需要运行两种客户端软件:执行客户端和共识客户端。
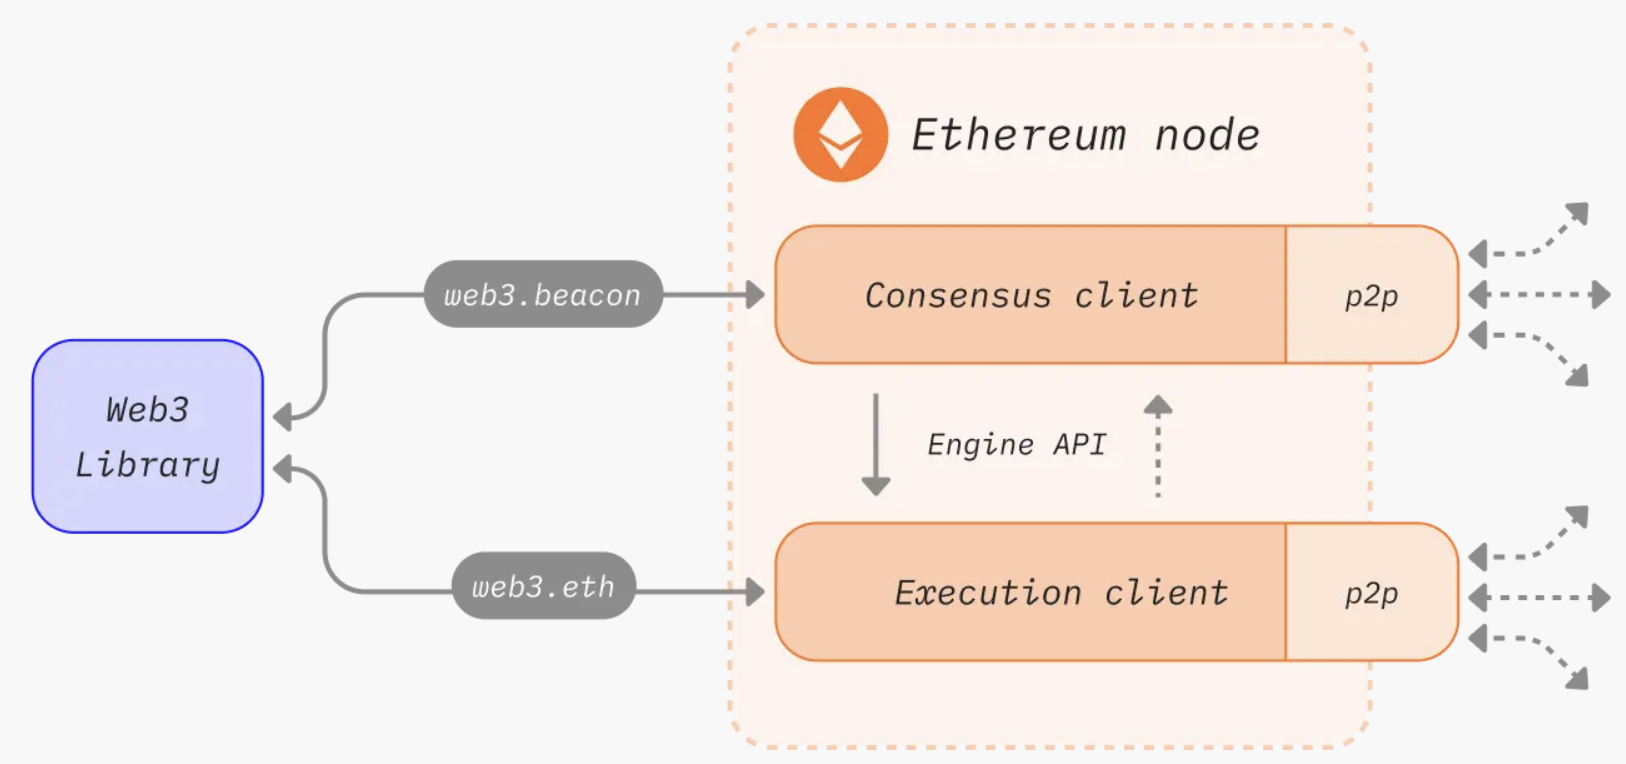
- 执行客户端(Execution Client, EL):侦听网络中广播的新交易,验证交易有效性,然后将它们放入本地的交易池中。EL负责交易执行和状态转换,如果是智能合约,则在内置的以太坊虚拟机中运行它,并更新以太坊的“世界状态”。另外,EL还提供面向用户的API。
| 客户端 | 语言 | 网络 |
|---|---|---|
| Geth | Go | 主网、Sepolia、Holesky |
| Nethermind | C#、.NET | 主网、Sepolia、Holesky |
| Besu | Java | 主网、Sepolia、Holesky |
| Erigon | Go | 主网、Sepolia、Holesky |
| Reth | Rust | 主网、Sepolia、Holesky |
-
共识客户端(Consensus Client, CL):实现权益证明共识算法,使网络能够对来自执行客户端的数据达成一致。管理验证者(Validators),处理他们的质押(Stake)和罚没,并为验证者分配任务。在某个时间点,它会指定一个验证者来提议 (Propose) 一个新区块。其他验证者则需要对这个区块进行证明 (Attest),即投票确认该区块的有效性。验证器客户端是共识客户端的可选附加组件。
客户端 语言 网络 Lighthouse Rust 信标链、Holesky、Pyrmont、Sepolia 等 Lodestar TypeScript 信标链、Holesky、Sepolia 等 Prysm Go 信标链、Gnosis、Holesky、Pyrmont、Sepolia 等 Teku Java 信标链、Gnosis、Holesky、Sepolia 等 Nimbus Nim 信标链、Holesky、Sepolia 等
那么,EL与CL如何协同工作? 他们通过一个名为 引擎API (Engine API) 的本地RPC接口进行通信。
三、启动一条以太坊私链
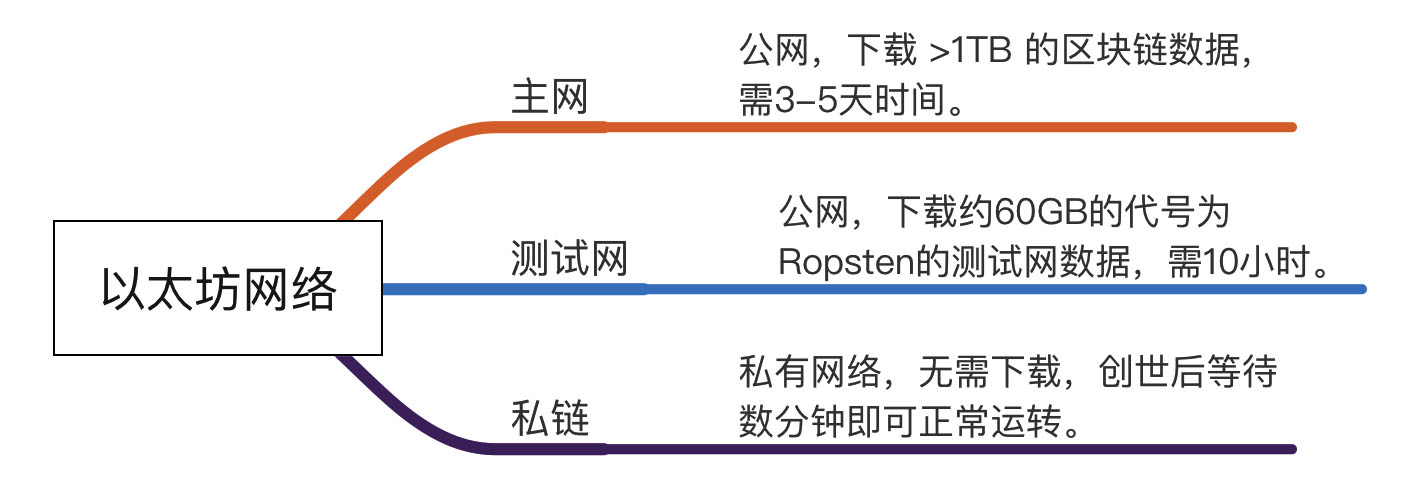 以太坊网络分为主网、测试网,这两个网络都是公开的链,为世界所有开发者和用户所用。而本文所写的是在本地启动一条私链,以做学习之用。
目前网上搜到的大部分搭建私链的教程(包括《以太坊指南针》)都过时了,一方面是新版本geth的命令参数已经变了,另一方面是新版本geth只支持PoS共识协议,不再支持PoW/PoA协议。而目前搜到的教程基本都是搭建PoW协议的私链,查了很久的资料才发现两个搭建PoS私链的教程:
不过本地开发测试用,最好还是部署PoA链。
权威证明 (PoA) 是一种基于信誉的共识算法,它是权益证明 (PoS) 的一个修改版本。这种共识机制主要用于私有链、测试网和本地开发网络,因为它不像工作量证明 (PoW) 那样需要高质量的资源,还通过让一小部分节点存储区块链数据并生成区块,克服了权益证明存在的可扩展性问题。
在权威证明中,选定一组授权“签名者”来创建新区块。 新的区块只能由这些基于信誉被挑选出来的签名者来创建。 每个签名者轮流获得机会,在特定时间范围内创建一个区块。 区块创建时间是固定的,签名者必须在该时间范围内创建一个区块。
PoA链的运行和维护成本低,对于开发者非常友好。目前有多种权威证明实现,标准以太坊实现是实现了 EIP-225 的 Clique。
3.1 软件安装
| 软件 | 版本 |
|---|---|
| Go | 1.23.12 |
| Geth & Tool | 1.13.15 |
自 geth v1.14 以来,clique 已被弃用,所以这里使用 v1.14 以前的版本。
安装Go
下载最新版本的Go,并解压到/root目录下
$ wget https://golang.google.cn/dl/go1.23.12.linux-amd64.tar.gz

$ tar -C /root -zxf go1.23.12.linux-amd64.tar.gz
然后设置环境变量
$ cd /root
$ vim ~/.bashrc

添加如下:
export GOPATH=/root/GoProjects
export GOROOT=/root/go
export PATH=$PATH:$GOROOT/bin保存以后source ~/.bashrc生效,查看go版本:
$ go version
go version go1.23.12 linux/amd64
安装Geth
下载以太坊的源代码:
$ git clone https://github.com/ethereum/go-ethereum.git编译geth客户端
$ cd go-ethereum/

设置GOPROXY代理
$ go env -w GOPROXY=https://goproxy.cn
$ make geth由于云服务器的内存不足,导致源码编译始终报错:
$ make geth
go run build/ci.go install ./cmd/geth
>>> /root/go/bin/go build -ldflags "--buildid=none -extldflags '-Wl,-z,stack-size=0x800000,--build-id=none,--strip-all'" -tags urfave_cli_no_docs,ckzg -trimpath -v -o /root/go-ethereum/build/bin/geth ./cmd/geth
github.com/influxdata/line-protocol
github.com/influxdata/line-protocol: /root/go/pkg/tool/linux_amd64/compile: signal: killed
util.go:48: exit status 1
exit status 1
make: *** [Makefile:13:geth] 错误 1所以改为去官网(https://geth.ethereum.org)直接下载`geth`的二进制包:
$ wget https://gethstore.blob.core.windows.net/builds/geth-alltools-linux-amd64-1.13.15-c5ba367e.tar.gz

$ tar xzf geth-alltools-linux-amd64-1.13.15-c5ba367e.tar.gz
$ mv geth-alltools-linux-amd64-1.13.15-c5ba367e/* /root/go-ethereum/bin/
修改~/.bashrc文件,添加路径:
export PATH=$PATH:$GOROOT/bin:/root/go-ethereum/bin保存source ~/.bashrc生效以后,执行Geth版本查询:
$ geth version
Geth
Version: 1.13.15-stable
Git Commit: c5ba367eb6232e3eddd7d6226bfd374449c63164
Git Commit Date: 20240417
Architecture: amd64
Go Version: go1.21.6
Operating System: linux
GOPATH=/root/GoProjects
GOROOT=/root/go
3.2 创建创世区块
选择网络 ID
自定义私链的网络ID,不同的网络ID无法互联通信。以太坊主网的网络ID为1,提供尚未被现有网络或测试网使用的网络 ID 意味着使用该网络 ID 的节点只能相互连接,从而创建专用网络。已经被使用的网络ID列表可在 Chainlist.org 查看。
$ geth --networkid 520520注:networkid 与genesis.json中chainId一样。
预创建签名者
PoA共识机制中,新区块只能由授权的“签名者”创建。初始授权签名者(一个或多个)在创世区块中配置。
在my_eth_chain目录下创建三个目录:bootdir、node1、node2,其中bootdir中配置bootnode节点用来做p2p网络路由,node1和node2则作为初始验证者的数据目录:
# mkdir my_eth_chain
# cd my_eth_chain/
# mkdir bootdir node1 node2
创建两个账户,关联两个节点:
# geth --datadir node1 account new
INFO [10-31|22:41:29.404] Maximum peer count                       ETH=50 total=50
INFO [10-31|22:41:29.406] Smartcard socket not found, disabling    err="stat /run/pcscd/pcscd.comm: no such file or directory"
Your new account is locked with a password. Please give a password. Do not forget this password.
Password:
Repeat password:

Your new key was generated

Public address of the key:   0x108E5C3086Efc06a962065b566F2683540ffB615
Path of the secret key file: node1/keystore/UTC--2025-10-31T14-42-22.047942992Z--108e5c3086efc06a962065b566f2683540ffb615

- You can share your public address with anyone. Others need it to interact with you.
- You must NEVER share the secret key with anyone! The key controls access to your funds!
- You must BACKUP your key file! Without the key, it's impossible to access account funds!
- You must REMEMBER your password! Without the password, it's impossible to decrypt the key!
# geth --datadir node2 account new
INFO [10-31|22:43:35.666] Maximum peer count ETH=50 total=50
INFO [10-31|22:43:35.668] Smartcard socket not found, disabling err="stat /run/pcscd/pcscd.comm: no such file or directory"
Your new account is locked with a password. Please give a password. Do not forget this password.
Password:
Repeat password:
Your new key was generated
Public address of the key: 0x304122cf4Bb676d63AEA9E7c49ceF9A08714D3ad
Path of the secret key file: node2/keystore/UTC--2025-10-31T14-43-53.924664270Z--304122cf4bb676d63aea9e7c49cef9a08714d3ad
- You can share your public address with anyone. Others need it to interact with you.
- You must NEVER share the secret key with anyone! The key controls access to your funds!
- You must BACKUP your key file! Without the key, it's impossible to access account funds!
- You must REMEMBER your password! Without the password, it's impossible to decrypt the key!生产的签名者地址由两个:
- 0x108E5C3086Efc06a962065b566F2683540ffB615
- 0x304122cf4Bb676d63AEA9E7c49ceF9A08714D3ad
编写genesis.json
早期版本可以使用puppeth来产生genesis.json文件,puppeth是geth自带的程序,可以引导用户创建geth的创世文件。但由于Puppeth在23年1月就被移出Geth,所以这里就直接使用现成的配置,放置于node1、node2同级目录下。
{
  "config": {
    "chainId": 520520,  // 与网络ID一样
    "homesteadBlock": 0,
    "eip150Block": 0,
    "eip155Block": 0,
    "eip158Block": 0,
    "byzantiumBlock": 0,
    "constantinopleBlock": 0,
    "petersburgBlock": 0,
    "istanbulBlock": 0,
    "muirGlacierBlock": 0,
    "berlinBlock": 0,
    "londonBlock": 0,
    "arrowGlacierBlock": 0,
    "grayGlacierBlock": 0,
    "clique": {
      "period": 0,      // 出块周期,单位秒,默认15秒。该值如果为0,则没有交易时将不出块。
      "epoch": 30000    // 切换验证者的周期,单位为区块数,默认30000个区块。
    }
  },
  "difficulty": "1",
  "gasLimit": "800000000",
  "extradata": "0x0000000000000000000000000000000000000000000000000000000000000000108E5C3086Efc06a962065b566F2683540ffB615304122cf4Bb676d63AEA9E7c49ceF9A08714D3ad0000000000000000000000000000000000000000000000000000000000000000000000000000000000000000000000000000000000000000000000000000000000",
  "alloc": {
    "108E5C3086Efc06a962065b566F2683540ffB615": { "balance": "1000000000000000000" },
    "304122cf4Bb676d63AEA9E7c49ceF9A08714D3ad": { "balance": "1000000000000000000" }
  }
}
初始验证者地址必须通过extradata字段指定。
| 各个字段解释如下: | 必填 | |
|---|---|---|
| chainId | 自定义私链的网络ID,不同的网络ID无法互联通讯,以太坊公链ID 为1,此处只要不与主链冲突即可 | |
| homesteadBlock | 发布以太坊家园(Homestead)版本时的区块高度 | |
| eip150Block | EIP150 HF block以太坊协议的一个更新,主要涉及账户模型的变更。 | |
| eip155Block | EIP155 HF block是以太坊于2016年增加的,用于防御重放攻击,即防止测试网络中的代币发送到主网络中。升级的目的在于在计算哈希值时加上签名数据和chainId | |
| eip158Block | EIP158 HF block是为了配合EIP155 HF block所进行的第2次升级,旨在清除状态 | |
| clique.period | 出块周期,单位秒,默认15秒。该值如果为0,则没有交易时将不出块。 | |
| clique.epoch | 切换验证者的周期,单位为区块数,默认30000个区块。 | |
| difficulty | PoW链中的挖矿的难度值 | |
| gasLimit | 单一区块最大 gas 消耗上限,用来限制能够打包进入块的交易数量,我们在学习中可以设置为最大。 | |
| extraData | 附加信息,根据需要随意填写。但在PoA共识机制中包含特定的格式,用来指定初始签名者。 | |
| alloc | 创世时各账户分配以太币的数量,不想分配则忽略。 |
为了防止没有交易时也一直产生空块(Empty Block),造成服务器资源的浪费,这里设置成没有交易时不出块。
配置密码文件
为了稍后解锁帐户,将每个帐户的密码保存到每个节点数据目录中的文本文件中。
# cd node1
# vim password.txt

# cd node2
# vim password.txt
初始化节点
# geth init --datadir node1 genesis.json
# geth init --datadir node2 genesis.json
初始化完成后,创世区块就创建了。
3.3 启动私有链
启动引导节点
先配置并启动 bootnode 节点用来做p2p网络路由:
$ cd bootdir/
$ bootnode --genkey boot.key   #创建名为boot.key的key文件

#后台运行(节点通信时需要处于运行状态,建议一直运行)
$ nohup bootnode -nodekey boot.key -addr :30305 2>> bootnode_output.log &

#输出
enode://bc85ff8c9e20f564105cf524f82557c8e60f734a0845ca054bf641323948e5d85fb306d464b4dd44143cd6c48fdc3536cea1566400976ceb3fdd3dc76392daa2@127.0.0.1:0?discport=30305
Note: you're using cmd/bootnode, a developer tool.
We recommend using a regular node as bootstrap node for production deployments.
传递给 -addr 的端口的选择是任意的,但公共以太坊网络使用 30303,因此最好避开。
启动node1、node2节点
确认bootnode运行的情况下,可以启动私有链节点了。
#节点1
nohup geth --datadir node1 --port 30306 --networkid 520520 \
    --unlock 0x108E5C3086Efc06a962065b566F2683540ffB615 --password node1/password.txt \
    --http --http.addr=172.17.31.131 --http.port 8545 --http.corsdomain "*" --http.api "admin,eth,txpool,personal,web3" \
    --mine --miner.etherbase 0x108E5C3086Efc06a962065b566F2683540ffB615 \
    --bootnodes enode://bc85ff8c9******c76392daa2@127.0.0.1:0?discport=30305 \
    --authrpc.port 8551 --allow-insecure-unlock 2>>node1/eth_output.log &

#节点2
nohup geth --datadir node2 --port 30307 --networkid 520520 \
    --unlock 0x304122cf4Bb676d63AEA9E7c49ceF9A08714D3ad --password node2/password.txt \
    --http --http.addr=172.17.31.131 --http.port 8546 --http.corsdomain "*" --http.api "admin,eth,txpool,personal,web3" \
    --mine --miner.etherbase 0x304122cf4Bb676d63AEA9E7c49ceF9A08714D3ad \
    --bootnodes enode://bc85ff8c9******c76392daa2@127.0.0.1:0?discport=30305 \
--authrpc.port 8552 --allow-insecure-unlock 2>>node2/eth_output.log &由于在genesis.json的extradata中指定了2个有签名权限的账户,分别属于2个节点,所以两个节点都开启挖矿(设置--mine)—— 两个验证者按照预设顺序轮流生成区块,A → B → A → B…
原则 : 在网络中 , 任何更改都需要由50%+1个节点提出 , 以使其生效。对于2个签名者 , 50%+1实际上是2 , 所以需要让第2个签名者的节点也启动挖矿。
geth启动时命令行参数可以使用geth --help查看,上述几个参数解释如下表: |
参数 | 解释 |
|---|---|---|
| --port | 监听以太坊节点之间P2P消息的TCP/UDP端口,默认30303。 | |
| --networkid | 指定以太坊网络ID,与chainId保持一样 | |
| --unlock | 要解锁的账户地址 | |
| --password | 解锁账户的密码 | |
| --http | 开启HTTP-RPC 服务,可供调用/调试访问。 | |
| --http.addr | HTTP-RPC 服务监听的地址,默认localhost。这里的172.17.31.131是云服务器的私有IP。 | |
| --http.port | HTTP-RPC 服务监听的端口,默认8545 | |
| --http.corsdomain | HTTP-RPC 服务监听的CORS跨域域名 | |
| --http.api | 允许提供的HTTP-RPC服务模块,在示例中选择了数个模块加载。 | |
| --mine | 节点启动挖矿功能,参与挖矿。 | |
| --miner.etherbase | 挖矿奖励的接受地址。 | |
| --bootnodes | 指定用于P2P发现引导的bootnode URL | |
| --authrpc.port | 设置认证监听的api端口,默认为8551。authrpc 模块是用来处理与以太坊账户相关的操作的,例如解锁账户。 | |
| --allow-insecure-unlock | 允许不安全的账户解锁,当账户相关RPC通过HTTP暴露时 | |
| console | (可选) 启动后进入命令行模式,直接输入命令互动操作。 |
以太坊PoA私链启动以后,node1和node2的输出日志如下,显示"出块暂停,等待交易",每10s运行一次发现过程,看有没有新的节点:
INFO [11-01|11:08:58.279] Unlocked account                         address=0x108E5C3086Efc06a962065b566F2683540ffB615
INFO [11-01|11:08:58.279] Legacy pool tip threshold updated        tip=0
INFO [11-01|11:08:58.279] Legacy pool tip threshold updated        tip=1,000,000,000
INFO [11-01|11:08:58.279] Snap sync complete, auto disabling
INFO [11-01|11:08:58.280] Commit new sealing work                  number=1 sealhash=b1f7b8..7bcb9b txs=0 gas=0 fees=0 elapsed="242.36µs"
WARN [11-01|11:08:58.280] Block sealing failed                     err="sealing paused while waiting for transactions"
INFO [11-01|11:09:07.199] Looking for peers                        peercount=0 tried=0 static=0
INFO [11-01|11:09:17.212] Looking for peers                        peercount=0 tried=0 static=0
INFO [11-01|11:09:27.233] Looking for peers                        peercount=1 tried=1 static=0
INFO [11-01|11:09:37.245] Looking for peers                        peercount=1 tried=0 static=0
INFO [11-01|11:09:47.272] Looking for peers                        peercount=1 tried=0 static=0
3.4 功能测试
执行$ geth attach node1/geth.ipc 进入 node1 的JavaScript命令行界面。
# geth attach node1/geth.ipc
Welcome to the Geth JavaScript console!
...
To exit, press ctrl-d or type exit
>
查看账户信息
# 查看账户列表
> eth.accounts
["0x108e5c3086efc06a962065b566f2683540ffb615"]

# 查看账户余额
> eth.getBalance("0x108E5C3086Efc06a962065b566F2683540ffB615")
1000000000000000000
> eth.getBalance("0x304122cf4Bb676d63AEA9E7c49ceF9A08714D3ad")
1000000000000000000

# 查看接收区块奖励的地址
> eth.coinbase
"0x108e5c3086efc06a962065b566f2683540ffb615"
查看区块信息
# 查看最新区块高度
> eth.blockNumber
0

# 查看最新区块信息(这里是创世区块)
> eth.getBlock('latest')
{
  baseFeePerGas: 1000000000,
  difficulty: 1,
  extraData: "0x0000000000000000000000000000000000000000000000000000000000000000108e5c3086efc06a962065b566f2683540ffb615304122cf4bb676d63aea9e7c49cef9a08714d3ad0000000000000000000000000000000000000000000000000000000000000000000000000000000000000000000000000000000000000000000000000000000000",
  gasLimit: 800000000,
  gasUsed: 0,
  hash: "0x2b6195e8a38c5dd2d5e2c40fb8aa4743693b5c8933335d098b2a2de79ed36fc4",
  logsBloom: "0x00000000000000000000000000000000000000000000000000000000000000000000000000000000000000000000000000000000000000000000000000000000000000000000000000000000000000000000000000000000000000000000000000000000000000000000000000000000000000000000000000000000000000000000000000000000000000000000000000000000000000000000000000000000000000000000000000000000000000000000000000000000000000000000000000000000000000000000000000000000000000000000000000000000000000000000000000000000000000000000000000000000000000000000000000000000",
  miner: "0x0000000000000000000000000000000000000000",
  mixHash: "0x0000000000000000000000000000000000000000000000000000000000000000",
  nonce: "0x0000000000000000",
  number: 0,
  parentHash: "0x0000000000000000000000000000000000000000000000000000000000000000",
  receiptsRoot: "0x56e81f171bcc55a6ff8345e692c0f86e5b48e01b996cadc001622fb5e363b421",
  sha3Uncles: "0x1dcc4de8dec75d7aab85b567b6ccd41ad312451b948a7413f0a142fd40d49347",
  size: 648,
  stateRoot: "0xb2f892307335d2f080c7a1957abc420cdf61d3dee5dd4d4f41930862a5dedf4a",
  timestamp: 0,
  totalDifficulty: 1,
  transactions: [],
  transactionsRoot: "0x56e81f171bcc55a6ff8345e692c0f86e5b48e01b996cadc001622fb5e363b421",
  uncles: []
}
发起转账交易
# 发起转账
> eth.sendTransaction({
......   to: '0x304122cf4Bb676d63AEA9E7c49ceF9A08714D3ad',
......   from: eth.accounts[0],
......   value: 25000
...... });
"0x77d5b3ed210d96b5bab84185e944fdc334b36bd37b485b8bfea3acdcbed23b37"

# 查看账户余额
> eth.getBalance("0x108E5C3086Efc06a962065b566F2683540ffB615")
999960624999975000
> eth.getBalance("0x304122cf4Bb676d63AEA9E7c49ceF9A08714D3ad")
1000021000000025000

# 查看最新区块
> eth.blockNumber
1
> eth.getBlock('latest')
{
  baseFeePerGas: 875000000,
  difficulty: 2,
  extraData: "0xd883010d0f846765746888676f312e32312e36856c696e757800000000000000e80757dacf34c1e8d77818f28510d1c8ded89fa1d370b649a5c19a9f0f2f938b2ffdb7f7d5a59a3412cb3488d113e0ea9d682f64024ef869544b6830a4277eaa01",
  gasLimit: 799218751,
  gasUsed: 21000,
  hash: "0x4b9b56b7bae94da73c228f3d10f7c20bfc9ad64289b2206b5d7f1687c176f49e",
  logsBloom: "0x00000000000000000000000000000000000000000000000000000000000000000000000000000000000000000000000000000000000000000000000000000000000000000000000000000000000000000000000000000000000000000000000000000000000000000000000000000000000000000000000000000000000000000000000000000000000000000000000000000000000000000000000000000000000000000000000000000000000000000000000000000000000000000000000000000000000000000000000000000000000000000000000000000000000000000000000000000000000000000000000000000000000000000000000000000000",
  miner: "0x0000000000000000000000000000000000000000",
  mixHash: "0x0000000000000000000000000000000000000000000000000000000000000000",
  nonce: "0x0000000000000000",
  number: 1,
  parentHash: "0x2b6195e8a38c5dd2d5e2c40fb8aa4743693b5c8933335d098b2a2de79ed36fc4",
  receiptsRoot: "0xf78dfb743fbd92ade140711c8bbc542b5e307f0ab7984eff35d751969fe57efa",
  sha3Uncles: "0x1dcc4de8dec75d7aab85b567b6ccd41ad312451b948a7413f0a142fd40d49347",
  size: 730,
  stateRoot: "0xbe38df3bdcdddf7c104398318db81a1ef224bc30f55fbb6cbad763e85a1a4c3f",
  timestamp: 1761969527,
  totalDifficulty: 3,
  transactions: ["0x77d5b3ed210d96b5bab84185e944fdc334b36bd37b485b8bfea3acdcbed23b37"],
  transactionsRoot: "0x42d5909bd893bd0997796c463448e4bb598aff466f54cce56a6496d7112de39d",
  uncles: []
}
由此,在发起了一次转账交易后,产生了创世区块后的第一个新区块(高度1)。
查看交易详情
> eth.getTransaction("0x77d5b3ed210d96b5bab84185e944fdc334b36bd37b485b8bfea3acdcbed23b37")
{
  accessList: [],
  blockHash: "0x4b9b56b7bae94da73c228f3d10f7c20bfc9ad64289b2206b5d7f1687c176f49e",
  blockNumber: 1,
  chainId: "0x3039",
  from: "0x108e5c3086efc06a962065b566f2683540ffb615",
  gas: 21000,
  gasPrice: 1875000000,
  hash: "0x77d5b3ed210d96b5bab84185e944fdc334b36bd37b485b8bfea3acdcbed23b37",
  input: "0x",
  maxFeePerGas: 3000000000,
  maxPriorityFeePerGas: 1000000000,
  nonce: 0,
  r: "0xcea953508c9b9425fefd123e59d18fee7a7bdd67ccffed43dd8d30e791ac1524",
  s: "0x324e781efc2057f41da81cbcad04d7999eeb8273b06013a5f5aa2d0c7edbe217",
  to: "0x304122cf4bb676d63aea9e7c49cef9a08714d3ad",
  transactionIndex: 0,
  type: "0x2",
  v: "0x1",
  value: 25000,
  yParity: "0x1"
}
本次交易的交易费 = Gas x GasPrice = 21000 x 1875000000 = 39375000000000,所以 node1 账户余额:
账户余额 = 1000000000000000000 - 39375000000000 - 25000 = 999960624999975000 wei相对应的,node2 打包新区块获得了小费奖励 = Gas x MaxPriorityFeePerGas = 21000 x 1000000000 = 21000000000000,所以 node2 账户余额:
账户余额 = 1000000000000000000 + 21000000000000 + 25000 = 1000021000000025000 weiEIP-1559提案更新了以太坊的交易费用计算方式,引入了maxFeePerGas和maxPriorityFeePerGas。
- MaxFeePerGas:每单位gas的最大费用(包含BaseFee和MaxPriorityFeePerGas)。
- MaxPriorityFeePerGas:(tip) 给矿工的小费。
基础费用(baseFeePerGas)会被销毁,而小费(maxPriorityFeePerGas)则支付给矿工。交易实际费用(fee)等于gasUsed乘以基础费用加小费(即gasPrice=baseFee+tip)。
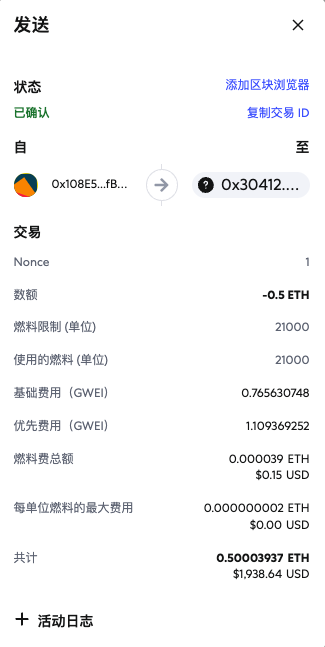
3.5 连接MetaMask
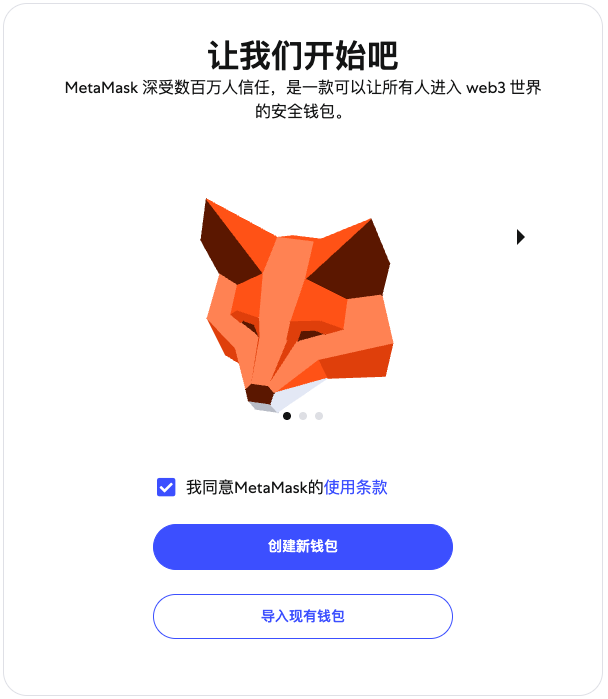
MetaMask是一个钱包插件,以Microsoft Edge浏览器为例,先在扩展商店搜索并安装MetaMask插件。
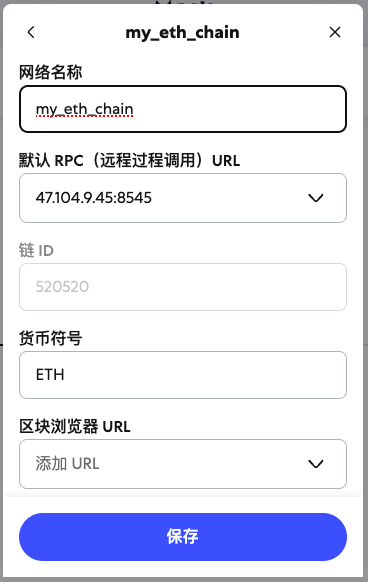
创建一个新钱包,然后添加自定义网络:
记得在服务器的控制台将8545端口开放防火墙
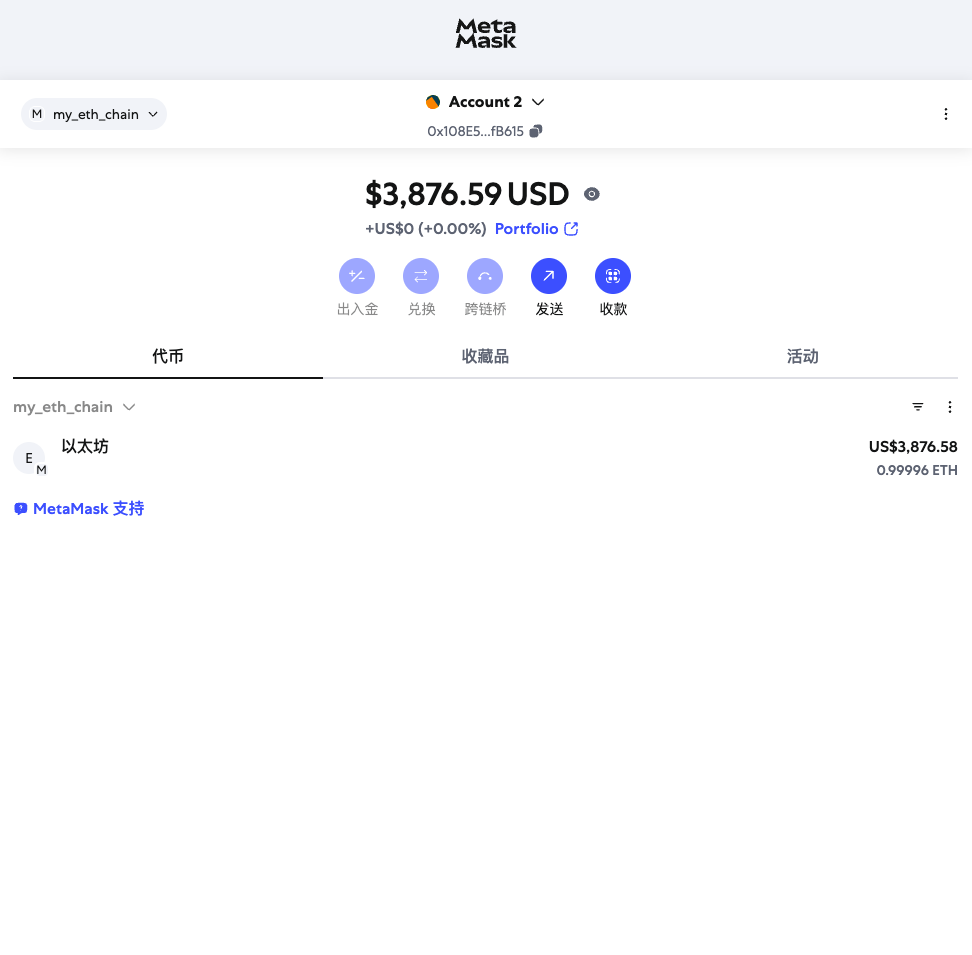
导入账户(目录/root/my_eth_chain/node1/keystore下的json文件),即可展示账户余额:
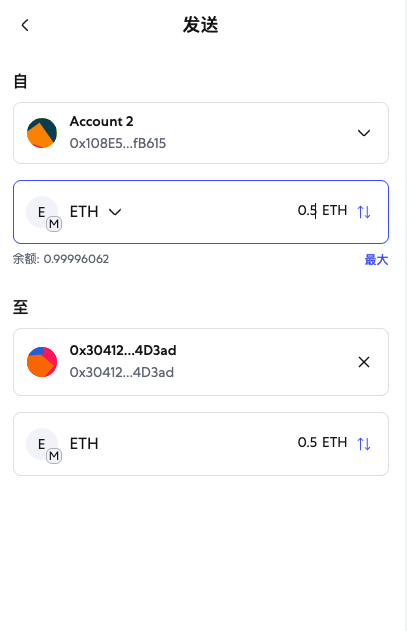
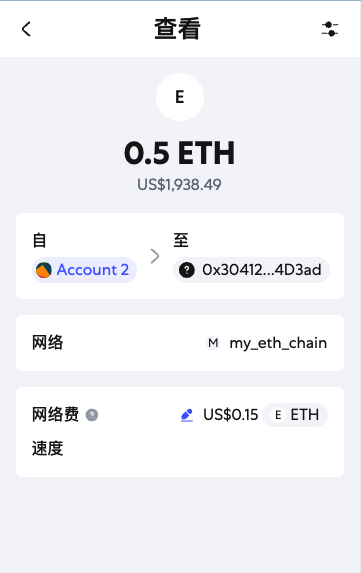
在 MetaMask 上进行转账:
- 原创
- 学分: 0
- 分类: 以太坊
- 标签:


