使用 Rails API 进行 x402 支付集成
- QuickNode
- 发布于 2025-11-21 20:31
- 阅读 1122
本文介绍了如何使用 Quicknode 的 open-source x402-rails 和 x402-payments gems,将 x402 支付协议集成到 Rails 应用程序中,从而实现按请求付费的 API 访问控制。你将学习如何配置 API 以要求付款,保护特定端点,并生成必要的客户端签名以使用 API。
概述
传统的 API 货币化依赖于订阅模式和 API 密钥,这为想要简单、按次付费访问的用户带来了摩擦。x402 支付协议通过使用支付层扩展 HTTP 来解决这个问题,从而实现真正的 按请求付费 访问。
本指南将向你展示如何使用 Quicknode 的开源 x402-rails 和 x402-payments gems 将 x402 协议集成到 Rails 应用程序中。你将学习如何配置你的 API 以要求支付、保护特定端点,以及生成必要的客户端签名来使用 API。
你将学习到什么
- x402 支付协议是什么,以及它如何实现按次付费 API
- 如何使用
x402-railsgem 创建服务器端支付墙 - 如何配置支付要求,如金额、链和结算模式
- 如何使用
x402-paymentsgem 生成客户端支付签名 - 乐观结算和非乐观结算之间的区别
- 如何配置多链支持(EVM 和 Solana 网络)
你需要什么
- 安装 Ruby 3.3.5 或更高版本
- Rails 和区块链概念的基础知识
- 一个带有 Base Sepolia 测试网 USDC 的测试钱包(使用 Circle 的水龙头 获取免费的测试 USDC)
什么是 x402 支付协议?
x402 是一个开放标准,它使用支付层扩展了 HTTP 402 Payment Required 状态代码。无需管理复杂的账单系统,你可以自动向用户收取他们发出的每个 API 请求的费用。
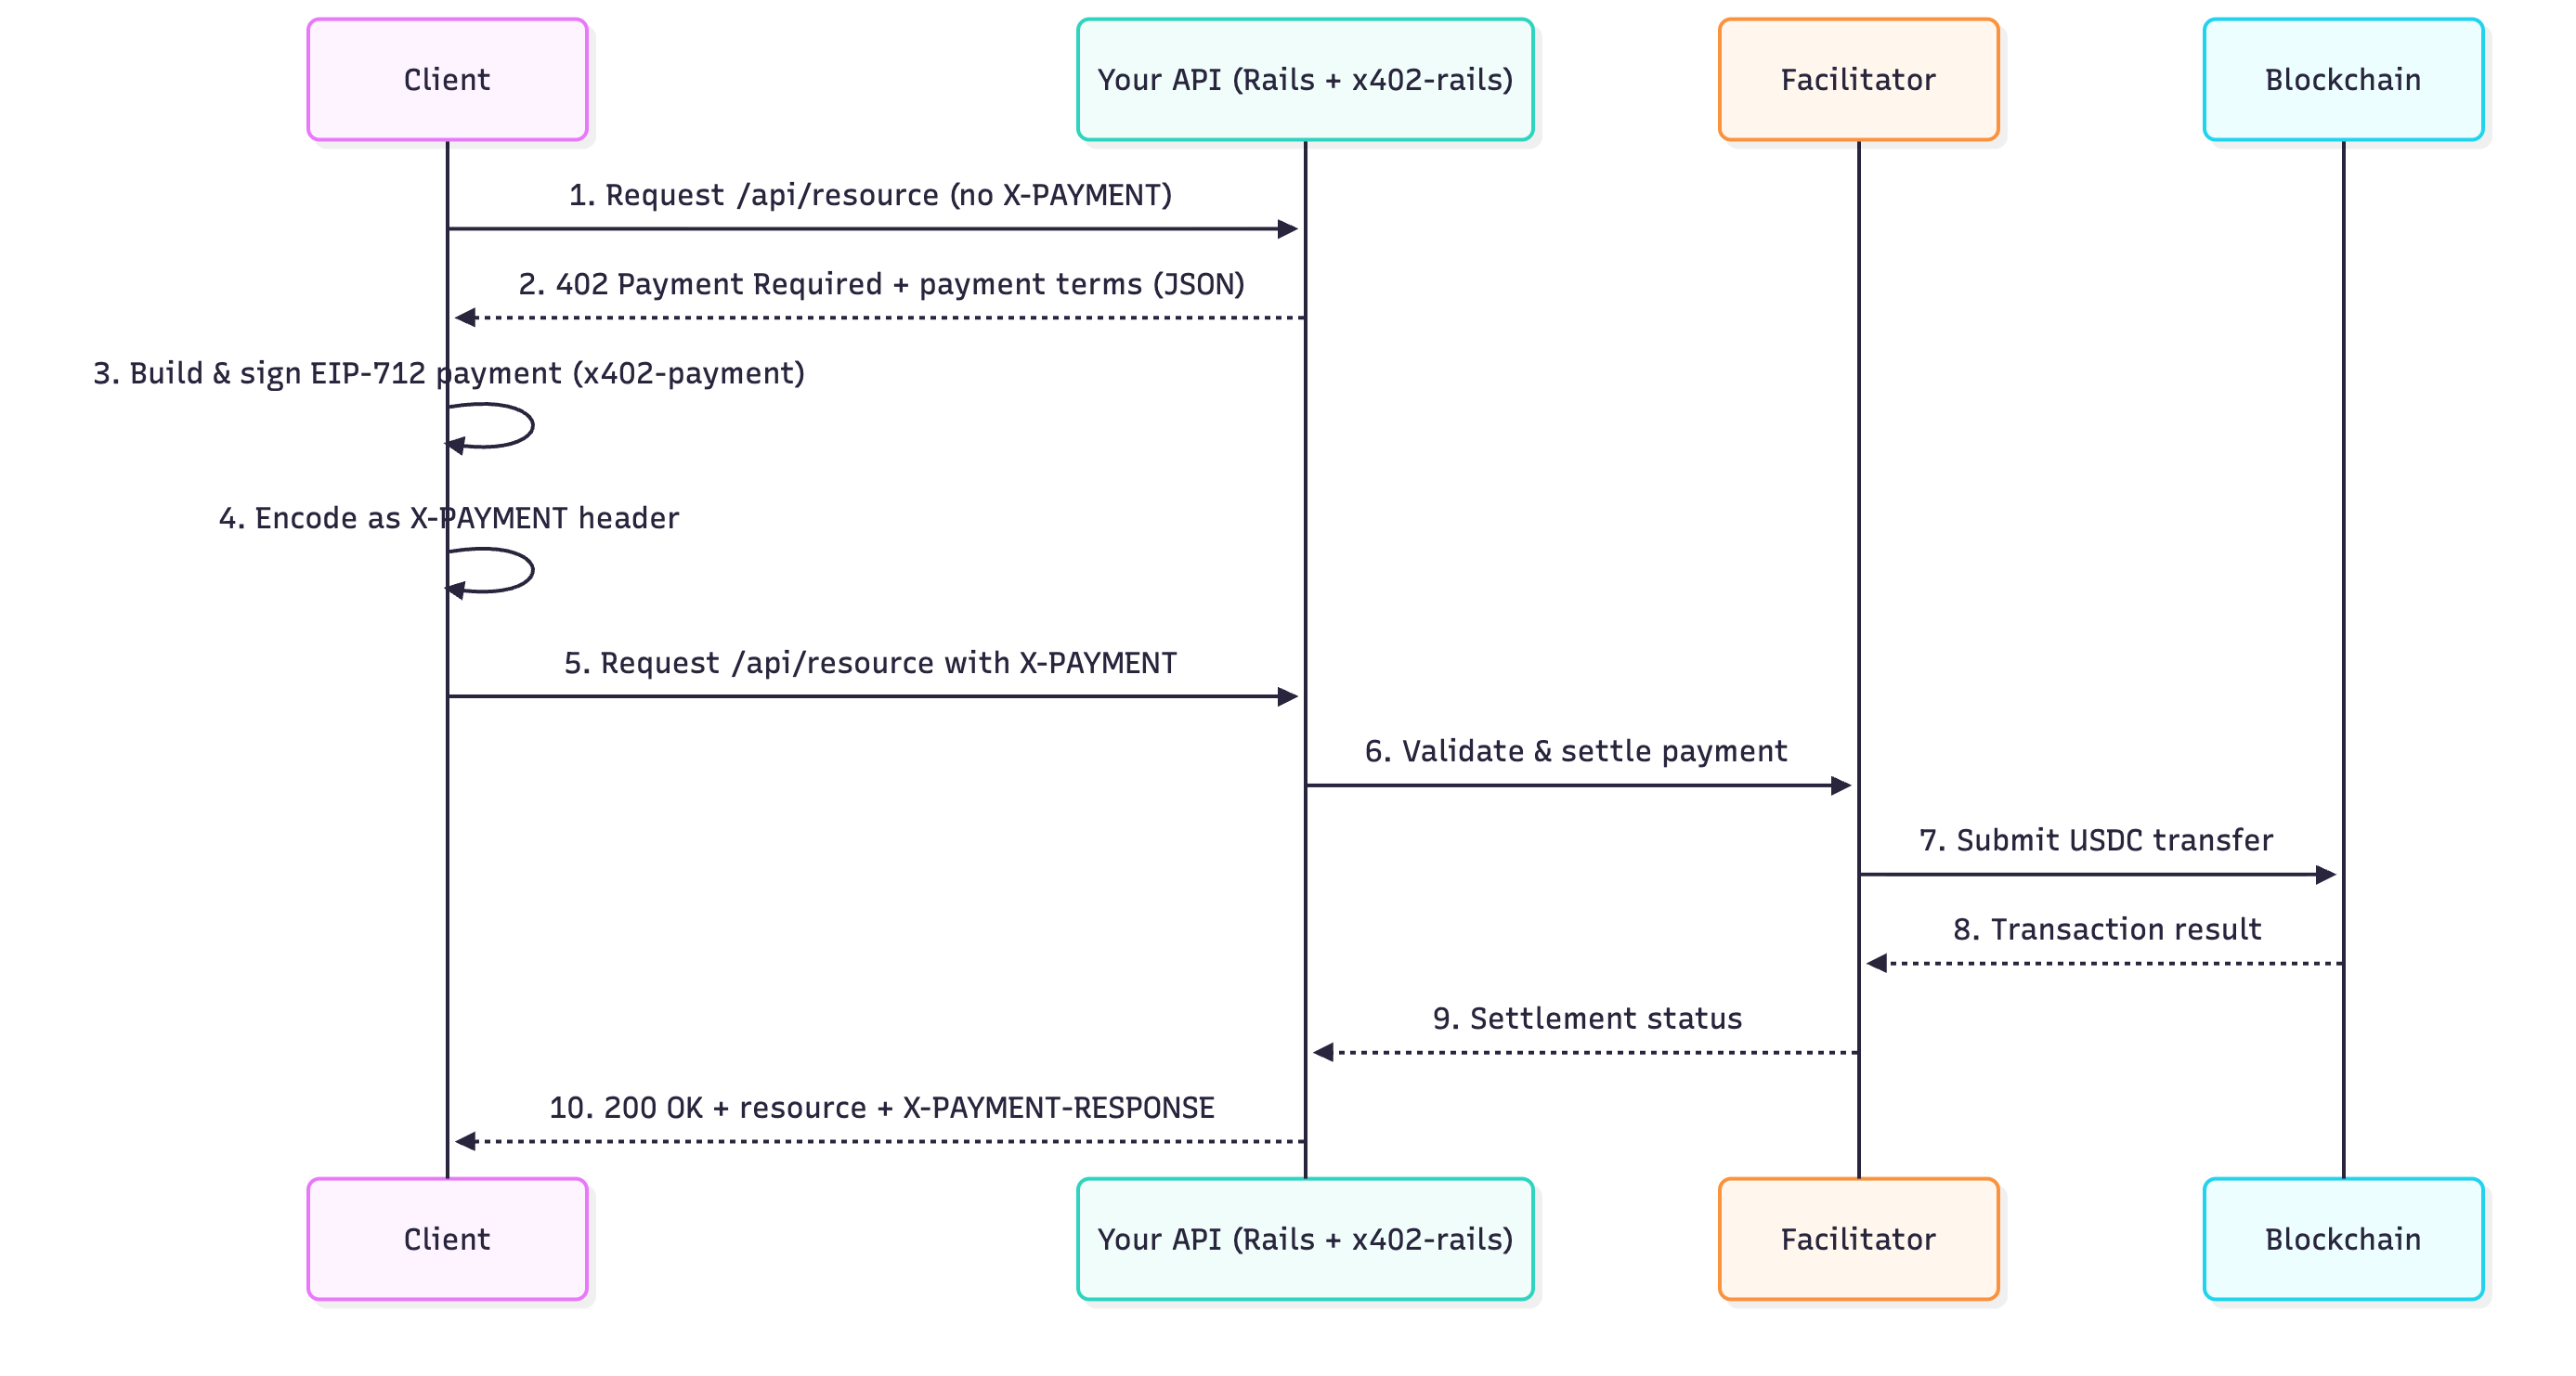
该协议在一个简单的循环中工作。让我们逐步分解它,然后在一个可视化图表中查看它:
- 客户端调用你的 API。
示例 API 调用
curl -i http://localhost:3000/api/weather/paywalled_info- 你的服务器以 HTTP 402 Payment Required 和支付说明进行响应。
示例 Payment Required 响应
{
  "x402Version": 1,
  "error": "Payment required to access this resource",
  "accepts": [\
    {\
      "scheme": "exact",\
      "network": "base-sepolia",\
      "maxAmountRequired": "1000",\
      "asset": "Asset Contract Address", // e.g., USDC on Base Sepolia\
      "payTo": "Recipient Address", // Your receiving wallet\
      "resource": "http://localhost:3000/api/weather/paywalled_info",\
      "description": "Payment required for /api/weather/paywalled_info",\
      // ...\
    }\
  ]
}- 客户端使用 EIP-712 签署支付授权,并将其编码为
X-PAYMENT标头。
示例支付标头
Payment Header (X-PAYMENT):
eyJ4NDAyVmVy... # Payment Authorization- 客户端使用该标头重新发送请求。
带有支付标头的示例 API 调用
curl -i -H "X-PAYMENT: eyJ4NDAyVmVy..." http://localhost:3000/api/weather/paywalled_info- 你的服务器验证支付,在链上结算它,并返回成功的响应。
示例成功响应
{
  "temperature": 72,
  "condition": "sunny",
  "humidity": 65,
}
为了在 Ruby 中简化此操作,Quicknode 提供了两个 gems:
-
x402-rails(服务器端):一个 Rails 引擎,提供中间件和控制器助手,可以轻松地“支付墙”你的 API 端点。它处理签名验证和支付结算。
-
x402-payments(客户端):一个助手库,用于生成复杂的 EIP-712 加密签名和使用 x402 驱动的 API 所需的
X-PAYMENT标头。
使用 x402 和 Ruby on Rails 的支付墙 API
在本节中,我们将使用一个示例应用程序,并解释如何在自己的 Rails 应用程序中设置和配置 x402。
Quicknode 的 qn-guide-examples 存储库中的这个 Rails 项目公开了一个天气 API 和一个高级 API,它们需要 USDC 支付才能访问天气数据。它演示了:
- 不需要支付的免费端点
- 响应 402 和支付要求的支付墙端点
- 对 EVM 和 Solana 网络的多链支持
- 用于速度或更强保证的不同结算模式
技术演练
在深入研究代码之前,让我们从高层次了解应用程序的流程。如果你对技术细节不感兴趣,请随意直接前往 快速入门 部分。
x402 配置
x402-rails gem 在 config/initializers/x402.rb 中初始化。它读取接收钱包、协调器 URL、链、货币和乐观模式的环境变量,并设置你的全局配置。典型的配置如下所示:
config/initializers/x402.rb
## config/initializers/x402.rb
X402.configure do |config|
  # Your wallet address (where payments will be received)
  # 你的钱包地址(将收到付款的地方)
  config.wallet_address = ENV.fetch("X402_WALLET_ADDRESS", "0xYourWalletAddressHere")

  # The service that handles on-chain settlement.
  # 处理链上结算的服务。
  # Use the public facilitator or your own.
  # 使用公共协调器或你自己的。
  config.facilitator    = ENV.fetch("X402_FACILITATOR_URL", "https://www.x402.org/facilitator")

  # The blockchain network for payments
  # 用于支付的区块链网络
  # e.g., "base-sepolia", "base", "solana-devnet"
  # 例如,“base-sepolia”、“base”、“solana-devnet”
  config.chain          = ENV.fetch("X402_CHAIN", "base-sepolia")

  # The payment currency (USDC is the standard)
  # 支付货币(USDC 是标准)
  config.currency       = ENV.fetch("X402_CURRENCY", "USDC")

  # Settlement mode:
  # 结算模式:
  # false (non-optimistic): Waits for onchain confirmation
  # false(非乐观):等待链上确认
  # true (optimistic): Responds immediately, settles in background
  # true(乐观):立即响应,在后台结算
  config.optimistic     = ENV.fetch("X402_OPTIMISTIC", "true") == "true"
end
这些设置告诉 x402-rails 在哪里接收 USDC 付款,使用哪个链,以及是乐观地响应还是等待结算。你还可以在控制器中覆盖每个端点的这些设置,我们稍后将看到。
什么是协调器?
协调器是 x402 支付流程的关键部分。在客户端发送带有已签名支付授权的请求后,服务器将该授权传递给协调器。然后,协调器:
- 验证已签名的授权
- 构建实际的 USDC 转账交易
- 支付提交它的 gas 费
- 将交易发送到区块链
- 将结算详细信息返回给你的 API
这种设计允许客户端支付 API 访问费用,而无需自己提交区块链交易。他们只签署一条消息(没有 RPC 调用、没有 gas 估算、没有钱包连接过程)。
你可以依赖 x402.org 上的公共协调器,或者如果你想要自定义结算行为、日志记录或对其他链的支持,则可以部署自己的实例。
控制器中的支付墙实施
向 API 端点添加支付墙就像调用 x402_paywall 辅助方法一样简单。x402-rails gem 将此辅助程序注入到你的控制器中,允许你使用一行代码来要求支付。在示例 WeatherController 中,paywalled_info 操作在返回数据之前收取 $0.001 USDC。
app/controllers/api/weather_controller.rb
  class WeatherController < ApplicationController
    # Paywalled endpoint (requires payment)
    # 支付墙端点(需要支付)
    def paywalled_info

      # 1. REQUIRE PAYMENT: This line protects the endpoint.
      # 1. 需要支付:此行保护端点。
      # It will return a 402 response if payment is missing or invalid.
      # 如果缺少或无效的付款,它将返回 402 响应。
      x402_paywall(amount: 0.001)

      # 2. STOP EXECUTION: If the paywall rendered a 402, stop.
      # 2. 停止执行:如果支付墙呈现 402,则停止。
      return if performed?

      # 3. ACCESS DATA: If payment was successful, continue.
      # 3. 访问数据:如果付款成功,请继续。
      # Payment info is available in the request environment.
      # 付款信息在请求环境中可用。
      payment_info = request.env["x402.payment"]

      render json: {
        temperature: 72,
        condition: "sunny",
        humidity: 65,
        paid_by: payment_info&.[](:payer),
        payment_amount: payment_info&.[](:amount),
        network: payment_info&.[](:network),
        payment_info: payment_info
      }
    end

    # Free endpoint (no paywall)
    # 免费端点(没有支付墙)
    def public_info
      # This endpoint has no paywall and is free.
      # 此端点没有支付墙并且是免费的。
      render json: {
        message: "This endpoint is free!",
        location: "San Francisco",
        timezone: "PST"
      }
    end
  end
路由
示例应用程序的路由在 config/routes.rb 中定义。这是每个 API 端点(无论是免费的还是受支付墙保护的)映射到其相应控制器操作的位置。天气 API 显示了 x402_paywall 的直接使用,而高级 API 使用 before_action 在多个端点上应用支付墙。
config/routes.rb
Rails.application.routes.draw do
  # Define your application routes per the DSL in https://guides.rubyonrails.org/routing.html
  # 根据 https://guides.rubyonrails.org/routing.html 中的 DSL 定义你的应用程序路由

  # Reveal health status on /up that returns 200 if the app boots with no exceptions, otherwise 500.
  # 在 /up 上显示运行状况,如果应用在没有异常的情况下启动,则返回 200,否则返回 500。
  # Can be used by load balancers and uptime monitors to verify that the app is live.
  # 可由负载均衡器和正常运行时间监视器用于验证应用是否正在运行。
  get "up" => "rails/health#show", as: :rails_health_check

  # x402 Payment Protocol Test Endpoints
  # x402 支付协议测试端点
  namespace :api do
    # Weather API endpoints (direct x402_paywall usage)
    # 天气 API 端点(直接使用 x402_paywall)
    get "weather/paywalled_info", to: "weather#paywalled_info"
    get "weather/paywalled_info_sol", to: "weather#paywalled_info_sol"
    get "weather/forecast", to: "weather#forecast"
    get "weather/public", to: "weather#public_info"

    # Premium API endpoints (before_action usage)
    # 高级 API 端点(before_action 使用)
    resources :premium, only: [ :index, :show ] do
      collection do
        get :free
      end
    end
  end
end
替代支付墙(可选)
如果多个端点需要相同的支付逻辑,则无需在每个操作中重复 x402_paywall。相反,你可以使用 before_action 过滤器应用一次。这就是高级 API (app/controllers/api/premium_controller.rb) 的结构方式;它将相同的支付墙应用于多个操作,从而保持控制器干净和一致。
app/controllers/api/premium_controller.rb
module Api
  class PremiumController < ApplicationController
    # Example of a paywall applied to multiple actions (show and index)
    # 应用于多个操作的支付墙示例(显示和索引)
    before_action :require_payment, only: [:show, :index]

    def index
      payment_info = request.env["x402.payment"]

      render json: {
        message: "Premium content list",
        items: ["Item 1", "Item 2", "Item 3"],
        paid_by: payment_info&.[](:payer)
      }
    end

    def show
      payment_info = request.env["x402.payment"]

      render json: {
        message: "Premium content details",
        id: params[:id],
        content: "This is premium content that requires payment",
        paid_by: payment_info&.[](:payer)
      }
    end

    def free
      render json: {
        message: "This premium controller endpoint is free",
        sample: "Here's a sample"
      }
    end

    private

    def require_payment
      x402_paywall(amount: 0.005, chain: "base-sepolia")
    end
  end
end
多链支持(可选)
x402 协议旨在跨多个区块链网络工作,并且每个端点都可以指定自己的链设置。这使你可以灵活地接受不同网络上的付款,具体取决于你的用例。
在示例应用程序中,WeatherController 的 paywalled_info_sol 端点要求在 Solana devnet 上付款,方法是将默认链覆盖为 solana-devnet。
app/controllers/api/weather_controller.rb
module Api
  class WeatherController < ApplicationController
    def paywalled_info_sol
      x402_paywall(
        amount: 0.001,
        chain: "solana-devnet",
        currency: "USDC",
        solana_fee_payer: "FuzoZt4zXaYLvXRguKw2T6xvKvzZqv6PkmaFjNrEG7jm",
        wallet_address: "EYNQARNg9gZTtj1xMMrHK7dRFAkVjAAMubxaH7Do8d9Y"
      )
      # ...
    end
  end
end
处理付款错误(可选)
为了提供清晰的错误消息,你可以捕获 x402-rails 引发的特定异常。这已经在 app/controllers/application_controller.rb 中设置好了。
app/controllers/application_controller.rb
class ApplicationController < ActionController::API
  # Application-wide x402 error handling
  # 应用程序范围内的 x402 错误处理
  rescue_from X402::InvalidPaymentError, with: :render_payment_error
  rescue_from X402::FacilitatorError, with: :render_facilitator_error
  rescue_from X402::ConfigurationError, with: :render_config_error

  private

  def render_payment_error(exception)
    render json: {
      error: "Payment Error",
      message: exception.message,
      type: "invalid_payment",
      status: 402
    }, status: :payment_required
  end

  def render_facilitator_error(exception)
    Rails.logger.error("[x402] Facilitator error: #{exception.message}")

    render json: {
      error: "Payment Service Unavailable",
      message: "Unable to process payment. Please try again.",
      type: "facilitator_error",
      status: 503
    }, status: :service_unavailable
  end

  def render_config_error(exception)
    Rails.logger.fatal("[x402] Configuration error: #{exception.message}")

    render json: {
      error: "Service Configuration Error",
      message: "Payment system not properly configured",
      status: 500
    }, status: :internal_server_error
  end
end
我们已经介绍了将 x402 支付集成到 Ruby on Rails 应用程序中的关键技术方面。现在,让我们开始使用示例项目。
快速开始
首先,克隆 Quicknode 示例项目:
步骤 1:克隆并安装依赖项
## Clone the repository
## 克隆存储库
git clone https://github.com/quiknode-labs/qn-guide-examples.git
cd qn-guide-examples/rails/x402-micropayments

## Install dependencies
## 安装依赖项
bundle install
步骤 2:配置环境变量
将 .env.example 文件复制到 .env 并更新以下变量。有关详细信息,请参阅文件中的注释。
cp .env.example .env步骤 3:启动服务器
启动服务器:
bin/rails server -p 3000你的 API 现在在 http://localhost:3000 上运行。现在,我们需要学习如何生成有效的付款签名来访问受支付墙保护的端点。
生成 x402 客户端付款
如前所述,客户端需要生成有效的支付签名 (X-PAYMENT 标头) 才能访问受支付墙保护的端点。示例项目包括不同语言的简单脚本,以生成用于不同用例的支付签名:
- Ruby:
generate-payment.rb - TypeScript:
generate-payment.ts - Python:
generate-payment.py
我们将在本指南中使用 Ruby 脚本,但该过程与其他语言类似,并且项目的 README 文件中提供了更多详细信息。
使用 Ruby 支付生成器
该脚本使用 bundler/inline 自动安装必要的依赖项,因此你无需设置单独的 Gemfile。
generate_payment.rb
## ... (see full script in the project)
## ...(请参阅项目中的完整脚本)

## Load .env file if it exists
## 如果存在,则加载 .env 文件
require 'dotenv'
Dotenv.load

## Configuration
## 配置
PRIVATE_KEY = ENV.fetch('X402_TEST_PRIVATE_KEY', '0xYourPrivateKeyHere')
PORT = ENV.fetch('PORT', '3000')
PAY_TO = ENV.fetch('X402_WALLET_ADDRESS', 'YourWalletAddressHere')

## Configure x402-payments gem
## 配置 x402-payments gem
X402::Payments.configure do |config|
  config.private_key = PRIVATE_KEY
  config.chain = 'base-sepolia'
  config.default_pay_to = PAY_TO
  config.max_timeout_seconds = 600
end

## Generate payment header
## 生成支付标头
## The gem handles all the EIP-712 signing internally
## 该 gem 在内部处理所有 EIP-712 签名
begin
  payment_header = X402::Payments.generate_header(
    amount: 0.001,  # $0.001 in USD
    resource: "http://localhost:#{PORT}/api/weather/paywalled_info",
    description: "Payment required for /api/weather/paywalled_info"
  )
end

## ... (see full script in the project)
## ...(请参阅项目中的完整脚本)
运行脚本
现在,运行该脚本:
ruby generate_payment.rb该脚本将输出支付标头,你可以在客户端中使用该标头。
注意: 付款的最大超时时间在脚本中设置为 600 秒。你可以根据你的用例调整此值。否则,付款将在 600 秒后过期。
测试支付墙
由于我们已经设置了服务器和支付生成器,我们现在可以测试完整的支付流程,并了解 x402 在实践中是如何工作的。
为你的钱包充值
要测试付款,你需要 Base Sepolia 测试网上的某些测试 USDC。你可以从 Circle USDC 水龙头 获得一些免费的测试 USDC。
支付墙端点
首先,尝试在没有支付标头的情况下访问受支付墙保护的端点:
curl -i http://localhost:3000/api/weather/paywalled_info你应该收到一个 402 响应,其中包含以下 JSON 有效负载:
{
  "x402Version": 1,
  "error": "Payment required to access this resource",
  "accepts": [\
    {\
      "scheme": "exact",\
      "network": "base-sepolia",\
      "maxAmountRequired": "1000",\
      "asset": "Asset Contract Address", // e.g., USDC on Base Sepolia\
      "payTo": "Recipient Address", // The receiving wallet\
      "resource": "http://localhost:3000/api/weather/paywalled_info",\
      "description": "Payment required for /api/weather/paywalled_info",\
      "maxTimeoutSeconds": 600,\
      "mimeType": "application/json",\
      "extra": {\
        "name": "USDC",\
        "version": "2"\
      }\
    }\
  ]
}
现在,使用 Ruby 脚本(或你首选的支付生成器)生成的支付标头来访问受支付墙保护的端点:
curl -i -H "X-PAYMENT: eyJ4NDAyVmVy..." http://localhost:3000/api/weather/paywalled_info你应该收到一个 200 响应,其中包含以下 JSON 有效负载:
{
"temperature": 72,
"condition": "sunny",
"humidity": 65,
"paid_by": "0x...",
"payment_amount": "1000",
"network": "base-sepolia"
// ...
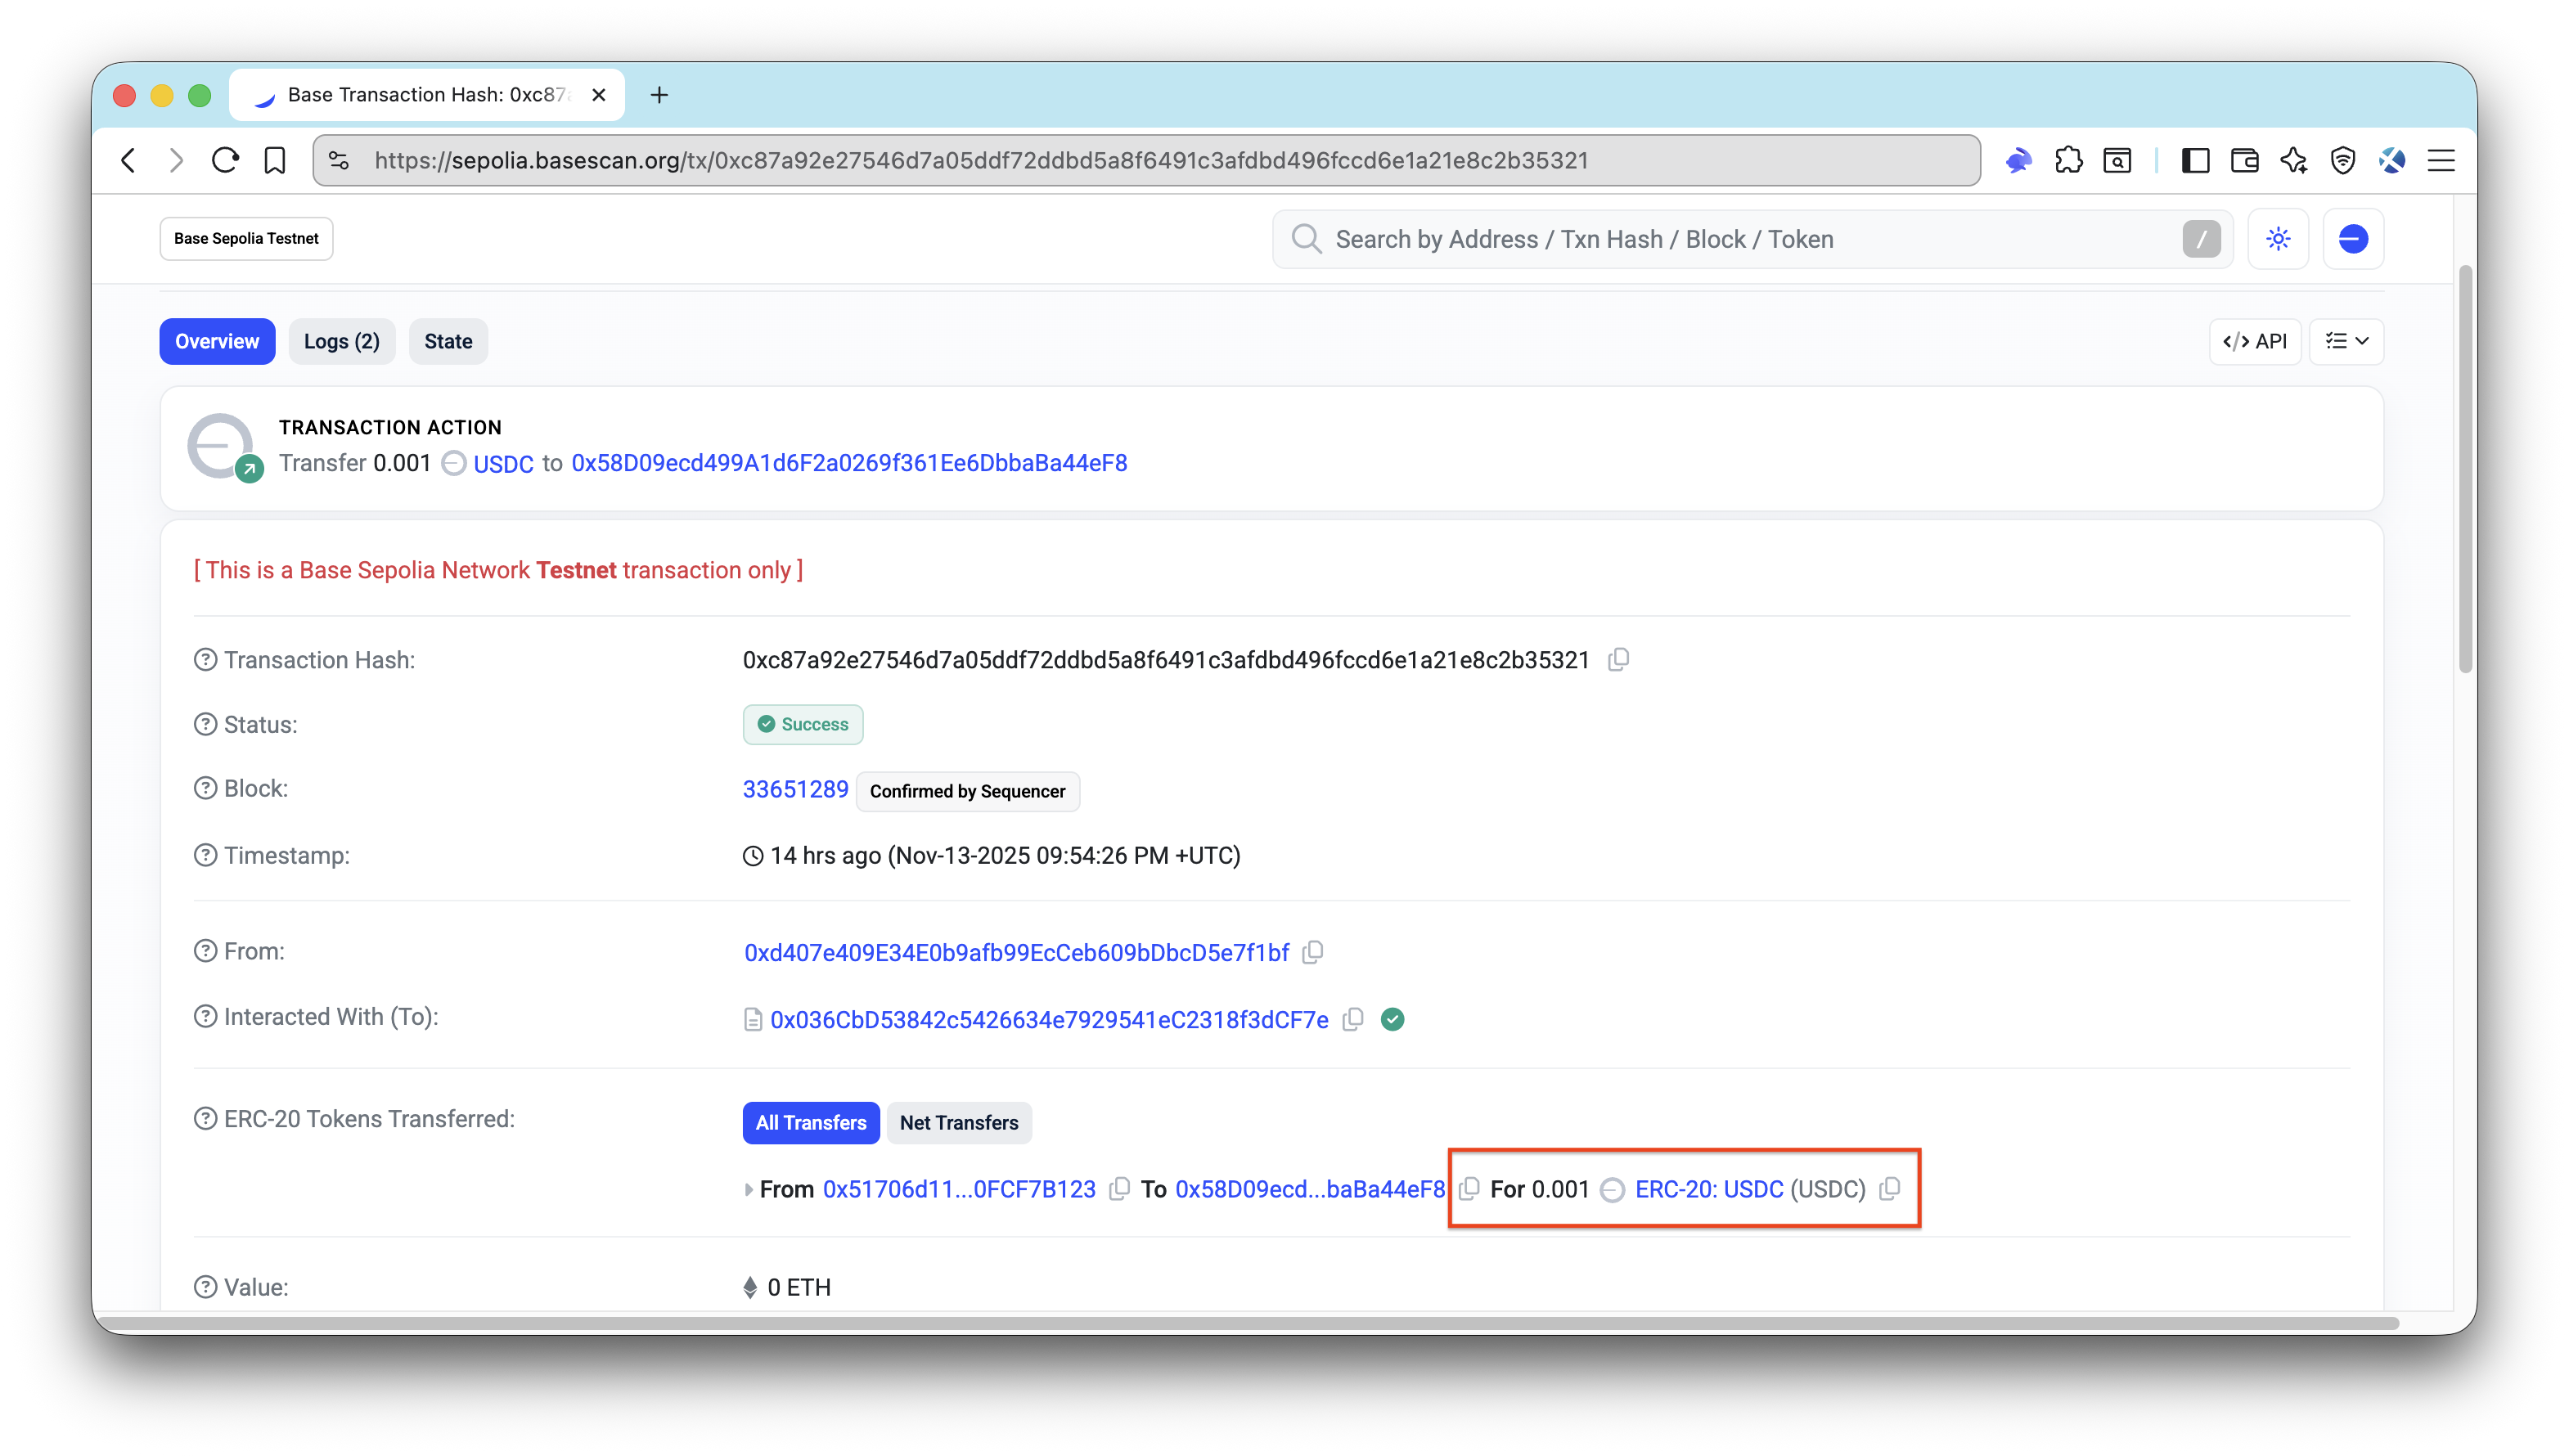
}恭喜!你已成功将 x402 支付集成到你的 Ruby on Rails 应用程序中。你现在可以使用支付标头来访问受支付墙保护的端点,并享受小额支付的好处。
使用区块链浏览器(例如,Base Sepolia Explorer)来验证支付交易是否已成功在区块链上结算。
免费端点
你还可以尝试访问免费端点:
curl -i http://localhost:3000/api/weather/public此端点不需要支付标头,因此你应该收到一个 200 响应,其中包含以下 JSON 有效负载:
{
  "message": "This endpoint is free!",
  "location": "San Francisco",
  "timezone": "PST"
}
结论
你现在对 x402、x402-rails 和 x402-payments 如何在真正的 Rails 应用程序中协同工作有了实际的理解。
从这里,你可以:
- 实现你自己的业务逻辑
- 引入每个端点或每个 HTTP 方法的不同价格
- 一旦你准备好投入生产,就从测试网切换到主网
- 探索托管你自己的协调器以获得更多控制权
如果你遇到困难或有疑问,请在我们的 Discord 中提出。通过在 X (@Quicknode) 或我们的 Telegram 公告频道 上关注我们,了解最新信息。
我们 ❤️ 反馈!
如果你对新主题有任何反馈或要求,请 告诉我们。我们很乐意听取你的意见。
- 原文链接: quicknode.com/guides/inf...
- 登链社区 AI 助手,为大家转译优秀英文文章,如有翻译不通的地方,还请包涵~


