区块链实战:发行自己的第一款NFT(Non-Fungible Token)数字藏品
- 李留白
- 发布于 2022-05-22 18:12
- 阅读 6044
注意:该项目仅供学习区块链知识,不作为任何投资建议。市场有风险,投资需谨慎。
注意:该项目仅供学习区块链知识,不作为任何投资建议。市场有风险,投资需谨慎。
本文项目代码:
https://github.com/hicoldcat/nft-web3-example
原文地址:
https://hicoldcat.com/posts/blockchain/my-nft/
NFT概念
NFT(Non-Fungible Token),官方学名非同质化代币,区别于同质化代币,表示的是具有不可分割性的数字资产。通俗上来理解,10美元可以拆分为10份,每一份都是1美元,每1份(1美元)都是等价的,这就是同质化代币。而类比于1副画价值10美元,是不可以拆分成10份,每份1美元的。所以NFT就是一个不可分割的数字资产,可以用来作为价值交换的代币,但是只能一个独立的整体存在。
初始化项目
Hardhat是一个编译、部署、测试和调试以太坊应用的开发环境。它可以帮助开发人员管理和自动化构建智能合约和DApps过程中固有的重复性任务,并围绕这一工作流程轻松引入更多功能。这意味着hardhat最核心的地方是编译、运行和测试智能合约。
创建一个文件夹如nft-web3-example,并使用npm init初始化项目。
添加hardhat依赖,
npm install --save-dev hardhat
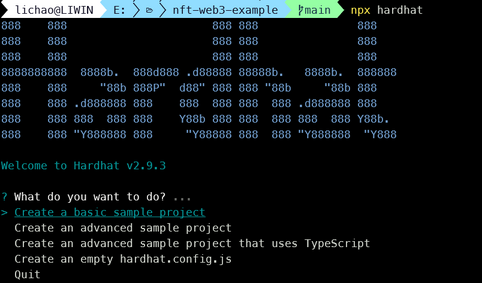
npm install --save-dev @nomiclabs/hardhat-waffle ethereum-waffle chai @nomiclabs/hardhat-ethers ethers使用hardhat初始化项目,选择Create a basic sample project, 生成项目结构文件模板
npx hardhat
开发合约
Solidity是一门面向合约的、为实现智能合约而创建的高级编程语言。
openzeppelin是一个用于安全智能合约开发的库,内置了很多常用合约的标准实现。
开发之前,先安装openzeppelin合约库,里面内置了许多智能合约的实现和一些常用的工具代码。
npm install @openzeppelin/contracts然后,在contracts目录下创建FOOL_NFT.sol文件。内容如下:
// SPDX-License-Identifier: MIT
pragma solidity ^0.8.4;

import "@openzeppelin/contracts/token/ERC721/ERC721.sol";
import "@openzeppelin/contracts/token/ERC721/extensions/ERC721URIStorage.sol";
import "@openzeppelin/contracts/token/ERC721/extensions/ERC721Burnable.sol";
import "@openzeppelin/contracts/access/Ownable.sol";
import "@openzeppelin/contracts/utils/Counters.sol";

/// @custom:security-contact hicoldcat@foxmail.com
contract FoolNFT is ERC721, ERC721URIStorage, ERC721Burnable, Ownable {
    using Counters for Counters.Counter;

    Counters.Counter private _tokenIdCounter;

    constructor() ERC721("FoolNFT", "FOOL") {}

    function safeMint(address to, string memory uri) public onlyOwner {
        uint256 tokenId = _tokenIdCounter.current();
        _tokenIdCounter.increment();
        _safeMint(to, tokenId);
        _setTokenURI(tokenId, uri);
    }

    // The following functions are overrides required by Solidity.

    function _burn(uint256 tokenId)
        internal
        override(ERC721, ERC721URIStorage)
    {
        super._burn(tokenId);
    }

    function tokenURI(uint256 tokenId)
        public
        view
        override(ERC721, ERC721URIStorage)
        returns (string memory)
    {
        return super.tokenURI(tokenId);
    }

    function currentCounter() public view returns (uint256) {
        return _tokenIdCounter.current();
    }

    function freeMint(address to, string memory nftTokenURI) public {
        _safeMint(to, _tokenIdCounter.current());
        _setTokenURI(_tokenIdCounter.current(), nftTokenURI);
        _tokenIdCounter.increment();
    }
}
节点配置
节点服务商infura和Alchemy的区别,可以看我的另一篇文章《ALCHEMY VS. INFURA:哪个是最好的区块链节点服务商?》
此次,我们将不使用本地运行一个以太坊节点的方式来部署合约,而是使用infura节点服务商提供的服务。
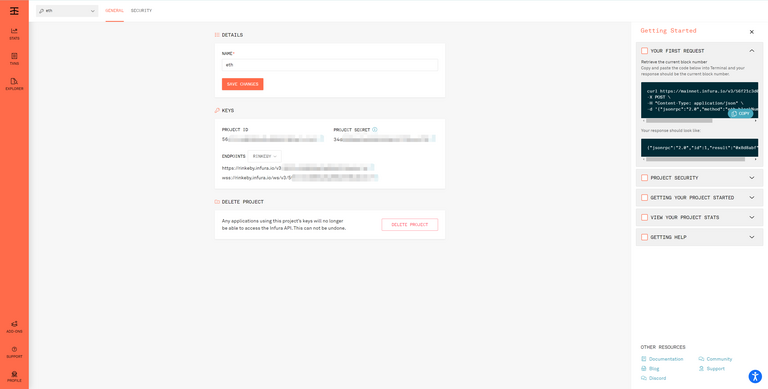
在 infura 上创建一个project,可以获得API调用地址。在以太坊测试网络中,我们选择rinkeby作为我们的测试网络。所以这个项目的API地址网络要选为rinkeby。

然后,因为我们再部署合约是需要用到一个Account,包括账号的公钥和私钥,所以,为了安全,我们使用dotenv存放部署合约以及和合约交互需要用到的数据。这样就不会写死到代码里。
在项目根目录下,执行如下命令:
//安装dotenv npm包
npm install dotenv

//根目录下创建.env文件
touch .env在.env文件中,增加如下内容,
PUBLIC_KEY=XXXXX
PRIVATE_KEY=XXXXX

API=https://rinkeby.infura.io/v3/XXXXX
API_KEY=XXXXX

NETWORK=rinkebyPUBLIC_KEY和PRIVATE_KEY可以从 matemask 中找到,或者自己创建一个新的 Account 。这里强烈建议创建一个新的来作为测试账号使用。私钥可以按路径导出:打开钱包-账号详情->导出私钥。
API和API_KEY是上面 infura 上创建的 API 地址和 PROJECT ID 。
NETWORK使用 rinkeby 。
编译合约
https://hardhat.org/guides/shorthand.html是一个NPM包,它安装了一个全局可访问的二进制文件,名为hh,运行项目本地安装的hardhat并支持任务的shell自动完成。
为方便开发,可以使用 hardhat shorthand, 安装方法如下:
npm i -g hardhat-shorthand

hardhat-completion install
之后,运行如下命令:
//合约编译
hh compile生成的artifacts文件夹就是编译之后的文件。
部署合约
在scripts目录下创建deploy.js,内容如下:
// We require the Hardhat Runtime Environment explicitly here. This is optional
// but useful for running the script in a standalone fashion through `node <script>`.
//
// When running the script with `npx hardhat run <script>` you'll find the Hardhat
// Runtime Environment's members available in the global scope.
const hre = require("hardhat");

async function main() {
    // Hardhat always runs the compile task when running scripts with its command
    // line interface.
    //
    // If this script is run directly using `node` you may want to call compile
    // manually to make sure everything is compiled
    // await hre.run('compile');

    // We get the contract to deploy
    const FoolNFT = await hre.ethers.getContractFactory("FoolNFT");
    const fool = await FoolNFT.deploy();

    await fool.deployed();

    console.log("FoolNFT deployed to:", fool.address);
    console.log("owner", await logo.owner());

}

// We recommend this pattern to be able to use async/await everywhere
// and properly handle errors.
main()
    .then(() => process.exit(0))
    .catch((error) => {
        console.error(error);
        process.exit(1);
});然后,修改hardhat.config.js内容,
require("@nomiclabs/hardhat-waffle");

// This is a sample Hardhat task. To learn how to create your own go to
// https://hardhat.org/guides/create-task.html
task("accounts", "Prints the list of accounts", async (taskArgs, hre) => {
  const accounts = await hre.ethers.getSigners();

  for (const account of accounts) {
    console.log(account.address);
  }
});

require('dotenv').config();

const { API, PRIVATE_KEY } = process.env;

// You need to export an object to set up your config
// Go to https://hardhat.org/config/ to learn more

/**
 * @type import('hardhat/config').HardhatUserConfig
 */
module.exports = {
  solidity: "0.8.4",
  defaultNetwork: "rinkeby",
  networks: {
    hardhat: {},
    rinkeby: {
      url: API,
      accounts: [`0x${PRIVATE_KEY}`]
    }
  },
};因为在合约部署到rinkeby网络时,是需要消耗ETH的,所以在部署之前,我们需要先获取一些测试用的ETH到我们之前创建的测试账号上面。打开https://fauceth.komputing.org/ 选择rinkeby网络,填入我们的钱包地址即可获取。
之后,在 metamask 钱包切换到rinkeby测试网络,可以看到我们领取的ETH已经到账户里了。

然后,我们就可以执行合约的部署了,
hh run scripts/deploy.js --network rinkeby

//执行完成后得到提示,代表合约部署完成
FoolNFT deployed to: 0x1F8fa1e7C29968b25C3a5129365Da8BC3990856b
owner 0xD936DEa2791e76F20A643d4149747e8598E51D8c
部署完成之后,我们既可以在https://rinkeby.etherscan.io/ 搜索我们的合约地址找到我们的合约信息。

另外,我们也可以在https://rinkeby.etherscan.io/address/AccountOwnerKey地址中,查询到资产消耗,地址中的AccountOwnerKey要替换成上面的owner 地址,也就是我们在.env里配置的PUBLIC_KEY。
如本例中,https://rinkeby.etherscan.io/address/0xD936DEa2791e76F20A643d4149747e8598E51D8c,领了三次测试币 0.42 ETH,部署合约消耗了 0.004464784529 ETH。

铸造NFT
https://nft.storage/是基于IPFS和Filecoin的开源存储服务。
在铸造NFT之前,我们要现在https://nft.storage/注册一个账号,然后获得 API Token。获取方式可以参考文档:https://nft.storage/docs/#get-an-api-token。

获取后,可以将这个Token 保存在.env中。在.env中增加如下内容:
// nft.storage的api token
NFT_STORAGE_TOKEN=XXX...

// 之前合约部署成功后的地址,本例中是0x1F8fa1e7C29968b25C3a5129365Da8BC3990856b
NFT_CONTRACT_ADDRESS=0x1F8fa1e7C29968b25C3a5129365Da8BC3990856b
之后,根据 nft.storage上的JavaScript client library文档https://nft.storage/docs/client/js/,安装nft.storage npm 包。
npm install nft.storage在scripts下创建mint.js文件如下:
// We require the Hardhat Runtime Environment explicitly here. This is optional
// but useful for running the script in a standalone fashion through `node <script>`.
//
// When running the script with `npx hardhat run <script>` you'll find the Hardhat
// Runtime Environment's members available in the global scope.

require("@nomiclabs/hardhat-ethers");
const hre = require("hardhat");
const path = require("path");
const fs = require("fs");
const NFTS = require("nft.storage");

// 调用dotenv配置方法
require('dotenv').config();

// NFT.storage 获取的API Token
const storageToken = process.env.NFT_STORAGE_TOKEN || "";

// NFTStorage 客户端实例
const client = new NFTS.NFTStorage({ token: storageToken });

// NFT合约部署成功后的地址
const CONTRACT_ADDRESS = process.env.NFT_CONTRACT_ADDRESS || "";

// 合约部署人
const OWNER = process.env.PUBLIC_KEY || "";

// 合约接口
const contractInterface = require("../artifacts/contracts/FOOL_NFT.sol/FoolNFT.json").abi;

// provider
const provider = new hre.ethers.providers.InfuraProvider(process.env.NETWORK, process.env.API_KEY);

// 钱包实例
const wallet = new hre.ethers.Wallet(`0x${process.env.PRIVATE_KEY}`, provider);

// 合约
const contract = new hre.ethers.Contract(CONTRACT_ADDRESS, contractInterface, provider)
const contractWithSigner = contract.connect(wallet);

// 上传文件到nft.storage
async function uploadNFTFile({ file, name, description }) {
    console.log("Uploading file to nft storage", { file, name, description });
    const metadata = await client.store({
        name,
        description,
        image: file,
    });
    return metadata;
}

// 铸造NFT
async function mintNFT({
    filePath,
    name = "",
    description = "",
}) {
    console.log("要铸造的NFT:", { filePath, name, description });
    const file = fs.readFileSync(filePath);

    const metaData = await uploadNFTFile({
        file: new NFTS.File([file.buffer], name, {
            type: "image/png", // image/png
        }),
        name,
        description,
    });

    console.log("NFT Storage上存储的NFT数据:", metaData);

    const mintTx = await contractWithSigner.safeMint(OWNER, metaData?.url);
    const tx = await mintTx.wait();
    console.log("铸造的NFT区块地址:", tx.blockHash);
}

// 入口函数
async function main() {

    // 读取根目录下assets文件夹下的文件
    const files = fs.readdirSync(path.join(__dirname, "../assets"));

    for (const file of files) {
        const filePath = path.join(__dirname, "../assets", file);
        await mintNFT({
            filePath,
            name: file,
            description: path.join(file),
        });
    }
}

// We recommend this pattern to be able to use async/await everywhere
// and properly handle errors.
main()
    .then(() => process.exit(0))
    .catch((error) => {
        console.error(error);
        process.exit(1);
    });
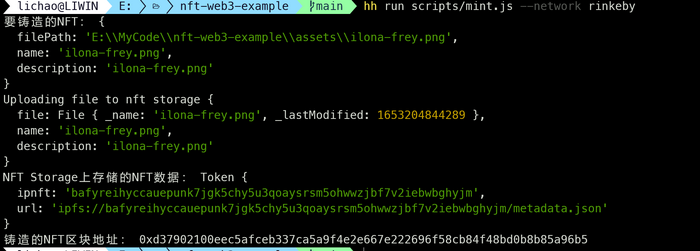
运行铸造NFT命令:
hh run scripts/mint.js --network rinkeby等待一会儿之后,会打印出如下信息:
要铸造的NFT: {
  filePath: 'E:\\MyCode\\nft-web3-example\\assets\\ilona-frey.png',
  name: 'ilona-frey.png',
  description: 'ilona-frey.png'
}
Uploading file to nft storage {
  file: File { _name: 'ilona-frey.png', _lastModified: 1653204844289 },
  name: 'ilona-frey.png',
  description: 'ilona-frey.png'
}
NFT Storage上存储的NFT数据: Token {
  ipnft: 'bafyreihyccauepunk7jgk5chy5u3qoaysrsm5ohwwzjbf7v2iebwbghyjm',
  url: 'ipfs://bafyreihyccauepunk7jgk5chy5u3qoaysrsm5ohwwzjbf7v2iebwbghyjm/metadata.json'
}
铸造的NFT区块地址: 0xd37902100eec5afceb337ca5a9f4e2e667e222696f58cb84f48bd0b8b85a96b5
查看NFT
此时,登录opensea或者looksrare等NFT市场,就可以查看我们铸造的NFT。地址如下:
opensea测试网络地址:https://testnets.opensea.io/
looksrare测试网络地址:https://rinkeby.looksrare.org/
以looksrare为例,选择登录,会唤起 metamask钱包登录:

授权登录后,就可以在个人中心,我的NFT中看到:


opensea查看方式类似。

总结
至此,我们发布自己的第一款NFT数字产品就完成了。之后,可以通过一些如use-nft,web3-react等一些前端库,结合前端框架去开发一些web页面来展示你自己的NFT网站交互逻辑,从而完成一款真正的NFT数字藏品交易网站。也可以参考登链社区上的一些文章,或者类似于https://github.com/jellydn/nft-app这样的入手项目去学习。
后续我也将尝试开发一款具有完整的NFT数字藏品铸造、展示和交易的网站来一起交流学习。欢迎持续关注!
我的个人网站:https://hicoldcat.com/
我的个人微信公众号:

- AI 正热,加密货币遇冷,那又如何? 72 浏览
- Layer Zero 发布 Zero 链:去中心化的多核世界计算机 136 浏览
- 如何在不到一分钟内发现Web3骗局 66 浏览
- MegaETH主网已上线:应用、社区以及为什么这个L2感觉与众不同 93 浏览
- 加密货币的长期博弈 177 浏览
- 加密货币的2026年 = 互联网的2002年:黎明前最黑暗的时刻 135 浏览
- 2025年第四季度加密货币和区块链风险投资 316 浏览
- 代币化的真实世界资产:初学者须知 652 浏览
- 量子计算与区块链:匹配紧迫性与实际威胁 711 浏览
- 房产代币化的分步指南 485 浏览
- 回顾 2025,展望 2026 977 浏览
- 比特币共识升级指南 597 浏览

