从 Python 调用智能合约
- ChinaDeFi 去中心化金融社区
- 发布于 2022-07-26 10:27
- 阅读 6111
以太坊带来了智能合约的进步,其是可公开验证的代码。如果我们改变合约状态,我们将花费一些gas。现在,让我们创建一个Python程序,它可以在以太坊上调用智能合约。

以太坊带来了智能合约的进步,其是可公开验证的代码。如果我们改变合约状态,我们将花费一些gas。现在,让我们创建一个Python程序,它可以在以太坊上调用智能合约。因为我们不想实验中支付费用,所以我们将运行Ganache,这是一个本地以太坊实例。
首先,我们去Remix.ethereum.org并添加我们的代码:
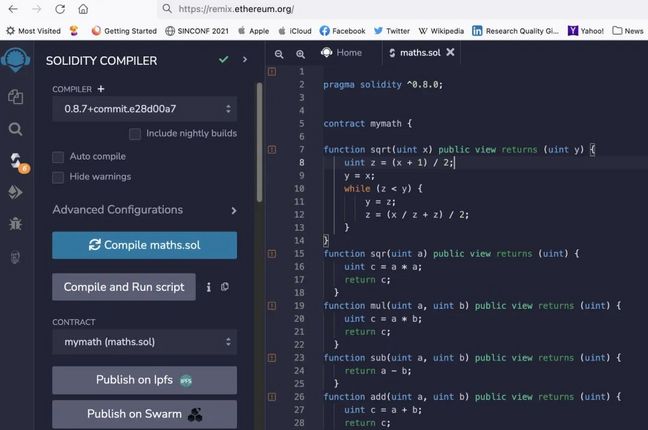
我们添加的代码中包括add(), sub(), mul(), sqr()和sqrt()函数:
pragma solidity ^0.8.0;

contract mymath {

function sqrt(uint x) public view returns (uint y) {
    uint z = (x + 1) / 2;
    y = x;
    while (z < y) {
        y = z;
        z = (x / z + z) / 2;
    }
}
function sqr(uint a) public view returns (uint) {
    uint c = a * a;
    return c;
  }
function mul(uint a, uint b) public view returns (uint) {
    uint c = a * b;
    return c;
  }
function sub(uint a, uint b) public view returns (uint) {
    return a - b;
  }
function add(uint a, uint b) public view returns (uint) {
    uint c = a + b;
    return c;
}}
现在编译我们的智能合约,并生成ABI(应用程序二进制接口)。通过ABI,我们可以创建智能合约中所有数据元素和函数。这通常用JSON格式定义。在我们的例子中,ABI是(可以从Remix中的ABI复制按钮中复制):
  {
    "inputs": [
      {
        "internalType": "uint256",
        "name": "a",
        "type": "uint256"
      },
      {
        "internalType": "uint256",
        "name": "b",
        "type": "uint256"
      }
    ],
    "name": "add",
    "outputs": [
      {
        "internalType": "uint256",
        "name": "",
        "type": "uint256"
      }
    ],
    "stateMutability": "view",
    "type": "function"
  },
  {
    "inputs": [
      {
        "internalType": "uint256",
        "name": "a",
        "type": "uint256"
      },
      {
        "internalType": "uint256",
        "name": "b",
        "type": "uint256"
      }
    ],
    "name": "mul",
    "outputs": [
      {
        "internalType": "uint256",
        "name": "",
        "type": "uint256"
      }
    ],
    "stateMutability": "view",
    "type": "function"
  },
  {
    "inputs": [
      {
        "internalType": "uint256",
        "name": "a",
        "type": "uint256"
      }
    ],
    "name": "sqr",
    "outputs": [
      {
        "internalType": "uint256",
        "name": "",
        "type": "uint256"
      }
    ],
    "stateMutability": "view",
    "type": "function"
  },
  {
    "inputs": [
      {
        "internalType": "uint256",
        "name": "x",
        "type": "uint256"
      }
    ],
    "name": "sqrt",
    "outputs": [
      {
        "internalType": "uint256",
        "name": "y",
        "type": "uint256"
      }
    ],
    "stateMutability": "view",
    "type": "function"
  },
  {
    "inputs": [
      {
        "internalType": "uint256",
        "name": "a",
        "type": "uint256"
      },
      {
        "internalType": "uint256",
        "name": "b",
        "type": "uint256"
      }
    ],
    "name": "sub",
    "outputs": [
      {
        "internalType": "uint256",
        "name": "",
        "type": "uint256"
      }
    ],
    "stateMutability": "view",
    "type": "function"
  }
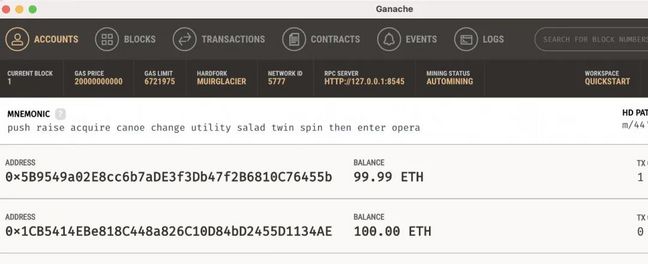
接下来,我们运行 Ganache:
然后可以选择Ganache作为我们的环境:

下一步部署智能合约:
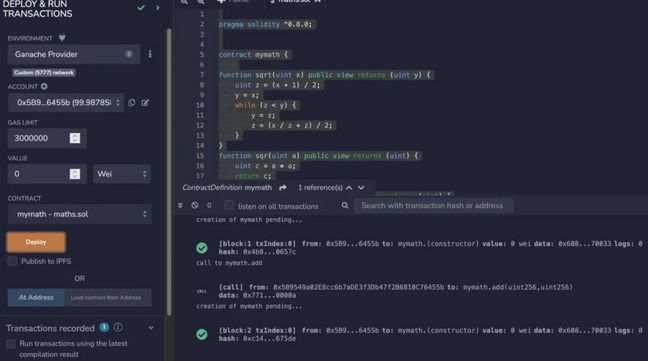
现在可以看到合约已经部署到了Block 2。合约已部署到以下地址:
0x1aC3CD1b37898ed4D3005f3C12b4425A6eFFDc30
对于Ganache,我们在端口 8545运行它,并可以通过web.Web()连接到它。然后可以将ABI数据压缩为一个字符串。我们可以使用we3.eth.contract()调用该合约:
import web3

w3 = web3.Web3(web3.HTTPProvider('http://127.0.0.1:8545'))
abi="[{\"inputs\":[{\"internalType\":\"uint256\",\"name\":\"a\",\"type\":\"uint256\"},{\"internalType\":\"uint256\",\"name\":\"b\",\"type\":\"uint256\"}],\"name\":\"add\",\"outputs\":[{\"internalType\":\"uint256\",\"name\":\"\",\"type\":\"uint256\"}],\"stateMutability\":\"view\",\"type\":\"function\"},{\"inputs\":[{\"internalType\":\"uint256\",\"name\":\"a\",\"type\":\"uint256\"},{\"internalType\":\"uint256\",\"name\":\"b\",\"type\":\"uint256\"}],\"name\":\"mul\",\"outputs\":[{\"internalType\":\"uint256\",\"name\":\"\",\"type\":\"uint256\"}],\"stateMutability\":\"view\",\"type\":\"function\"},{\"inputs\":[{\"internalType\":\"uint256\",\"name\":\"a\",\"type\":\"uint256\"}],\"name\":\"sqr\",\"outputs\":[{\"internalType\":\"uint256\",\"name\":\"\",\"type\":\"uint256\"}],\"stateMutability\":\"view\",\"type\":\"function\"},{\"inputs\":[{\"internalType\":\"uint256\",\"name\":\"x\",\"type\":\"uint256\"}],\"name\":\"sqrt\",\"outputs\":[{\"internalType\":\"uint256\",\"name\":\"y\",\"type\":\"uint256\"}],\"stateMutability\":\"view\",\"type\":\"function\"},{\"inputs\":[{\"internalType\":\"uint256\",\"name\":\"a\",\"type\":\"uint256\"},{\"internalType\":\"uint256\",\"name\":\"b\",\"type\":\"uint256\"}],\"name\":\"sub\",\"outputs\":[{\"internalType\":\"uint256\",\"name\":\"\",\"type\":\"uint256\"}],\"stateMutability\":\"view\",\"type\":\"function\"}]"
c = w3.eth.contract(address='0x1aC3CD1b37898ed4D3005f3C12b4425A6eFFDc30', abi=abi)

a=5
b=4

rtn= c.caller().add(a,b)
print(f"{a}+{b}={rtn}")
rtn= c.caller().mul(a,b)
print(f"{a}*{b}={rtn}")
rtn= c.caller().sub(a,b)
print(f"{a}-{b}={rtn}")
rtn= c.caller().sqr(a)
print(f"sqr({a})={rtn}")
rtn= c.caller().sqrt(a)
print(f"sqrt({a})={rtn}")
现在我们可以简单地调用智能合约中的函数,形式如下:
rtn= c.caller().add(a,b)

print(f"{a}+{b}={rtn}")
下面的代码运行示例验证了对智能合约的调用:
% **python web.py**
5+4=9
5*4=20
5-4=1
sqr(5)=25
sqrt(5)=2
我们需要做的就是编译智能合约并部署它,然后记录智能合约和ABI的地址,最后调用智能合约中的功能。
Source:https://medium.com/@billatnapier/calling-smart-contracts-from-python-977a8a9190e2
关于
ChinaDeFi - ChinaDeFi.com 是一个研究驱动的DeFi创新组织,同时我们也是区块链开发团队。每天从全球超过500个优质信息源的近900篇内容中,寻找思考更具深度、梳理更为系统的内容,以最快的速度同步到中国市场提供决策辅助材料。


