Web3系列教程之进阶篇---3. 以太坊域名服务(ENS)
- 李留白
- 发布于 2022-08-10 13:33
- 阅读 6182
了解以太坊生态系统,这样你就不会每次都重新发明轮子。使用Chainlink, ENS, The Graph, IPFS, Ceramic, Polygon, NEAR等开发吧!

背景
当网络最初开始时,你在网上探索信息的唯一方法是输入IP地址。此后,DNS的概念被引入,帮助我们将域名与IP地址联系起来。
因此,只要你输入hicoldcat.com,DNS就会负责将其翻译成相应的IP,这就是计算机最终理解的内容。
什么是 ENS?
-
ENS 即
The Ethereum Name Service,它与DNS在web2空间的行为非常相似。 -
我们都知道,以太坊的地址很长,很难记住或输入。
-
ENS通过将这些钱包地址、哈希值等翻译成可读域,然后保存在以太坊区块链上,解决了这个问题
-
ENS最好的部分是,与集中式的DNS服务器不同,ENS在智能合约的帮助下工作,具有抗审查能力。
-
因此,现在当你向某人发送你的钱包地址,看起来像0x1234huiahi....,你实际上可以向他们发送tom.eth,ENS会发现tom.eth实际上等于你的钱包地址(0x1234huiahi....)。
要求
是时候使用ENS开发一些东西了。
我们将开发一个网站,如果一个地址有ENS,它可以显示这个地址的ENS。
开始吧!
设置
- 首先让我们为你的地址取一个 ENS 名称,从打开https://app.ens.domains/开始
- 当你打开网站的时候,确保你的 MetaMask 已经连接到 Rinkeby 测试网络,并且它有一些 Rinkeby Ether
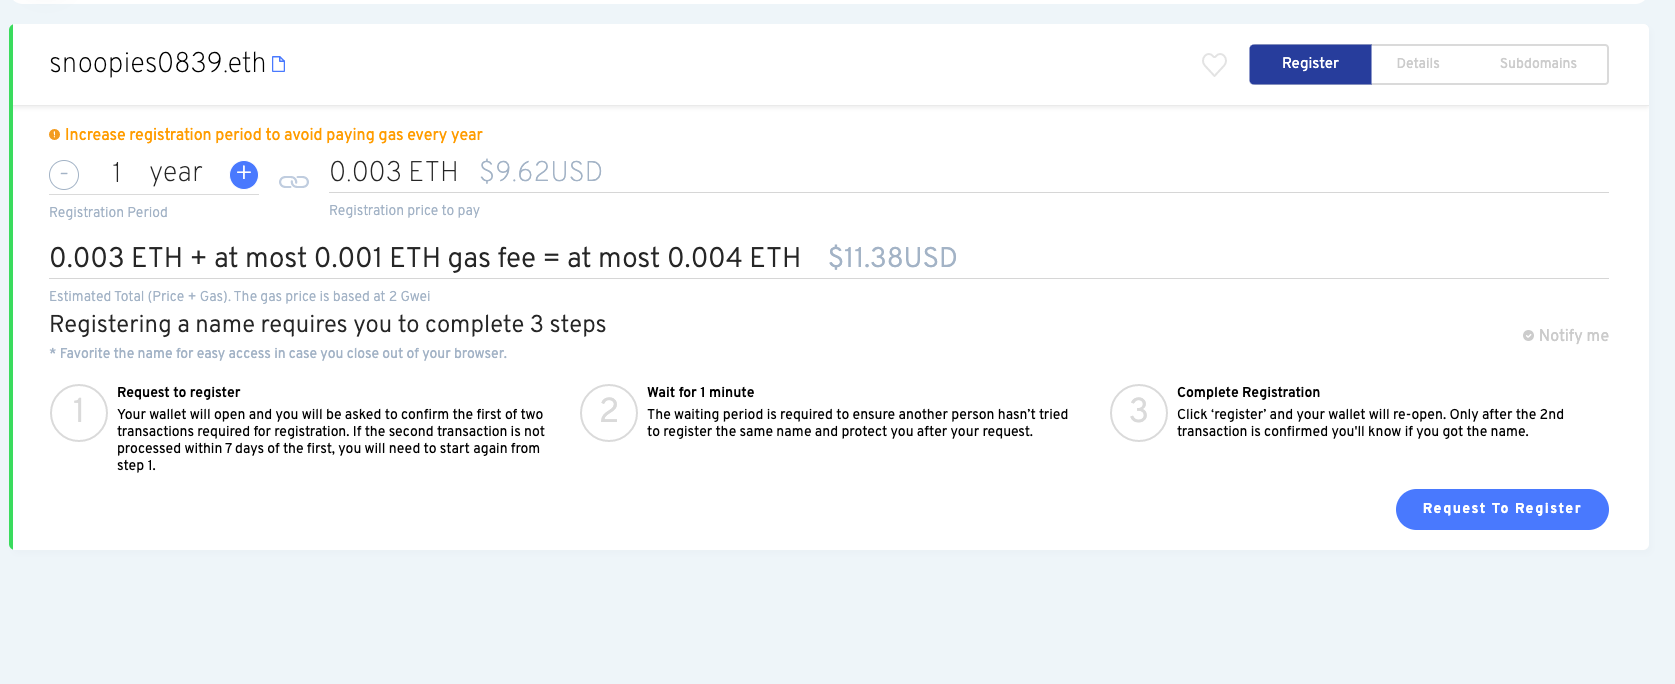
- 搜索一个 ENS 域名,任何你喜欢的名称,只要它是可用的!
- 点击
Available

- 然后点击
Request To Register申请注册

- 当进度条进入第三步时,点击
Register注册

-
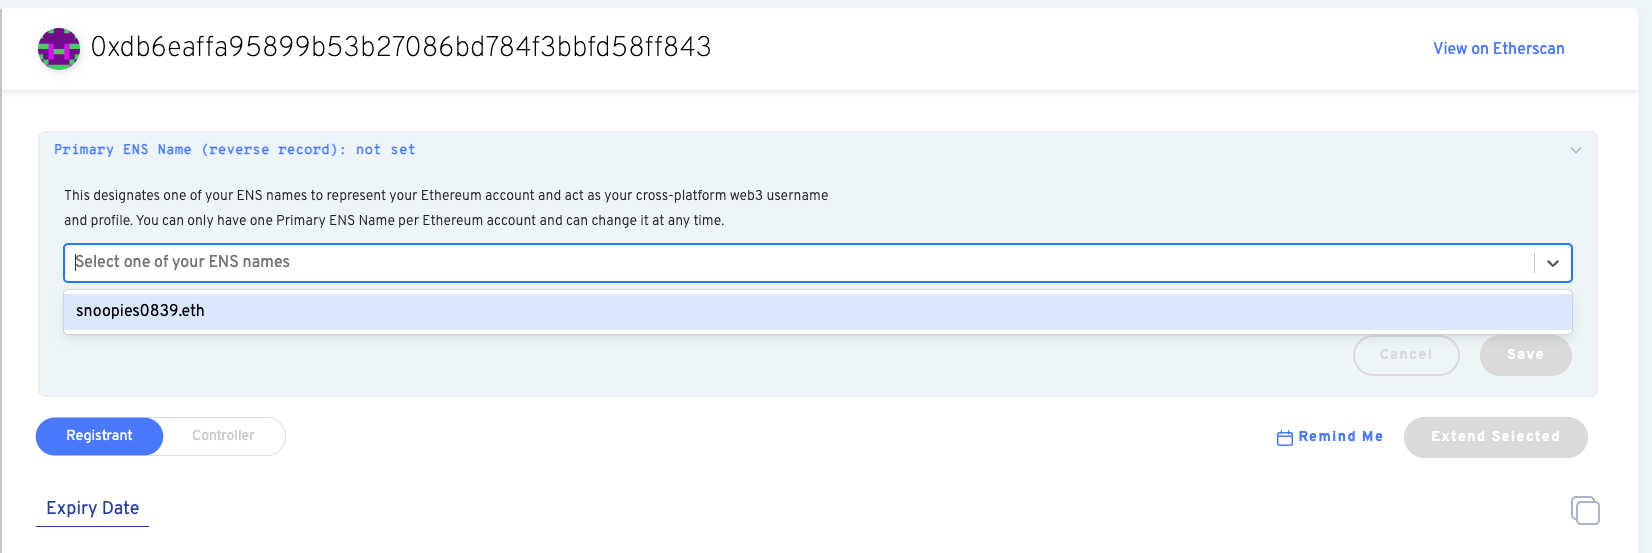
然后在进度条完成后,点击
Set As Primary ENS Name设置为主要ENS名称。 -
然后从下拉列表中选择您刚刚创建的 ENS 名称

- 点击
save保存

- 现在你在Rinkeby的地址上注册了一个ENS系统
牛逼,你做到了!
网站
-
为了开发网站,我们将使用 React 和 Next Js。React 是一个用于创建网站的 javascript 框架,而 Next.js 是一个 React 框架,它也允许编写后端 API 代码以及前端,所以你不需要两个独立的前端和后端服务。
-
首先,您需要创建一个新的
next应用程序。您的文件夹结构应该类似于
- ENS
- my-app- 要创建这个
next-app应用程序,在终端指向ENS文件夹并输入
npx create-next-app@latest然后按回车键确认所有问题
- 现在运行应用程序,在终端中执行这些命令
cd my-app
npm run dev-
现在让我们安装 Web3Modal 库。Web3Modal 是一个易于使用的库,可以帮助开发人员轻松地允许用户使用各种不同的钱包连接到 dApps。默认情况下,Web3Modal Library 支持注入式提供者(Metamask、 Dapper、 Gnosis Safe、 Frame、 Web3 Browser 等)和 WalletConnect,你也可以轻松配置该库以支持 Portis、 Fortmatic、 Squarelink、 Torus、 Autherum、 D’cENT Wallet 和 Arkane。打开一个指向 my-app 目录的终端并执行以下命令
npm install web3modal- 在同一终端中还要安装
ethers.js
npm install ethers-
在
my-app/public文件夹中,下载该图像并将其重命名为 Learnweb3Punks.png -
现在转到 style 文件夹,用下面的代码替换
Home.modules.css文件的所有内容,这会给你的 dapp 添加一些样式:
.main {
  min-height: 90vh;
  display: flex;
  flex-direction: row;
  justify-content: center;
  align-items: center;
  font-family: "Courier New", Courier, monospace;
}

.footer {
  display: flex;
  padding: 2rem 0;
  border-top: 1px solid #eaeaea;
  justify-content: center;
  align-items: center;
}

.image {
  width: 70%;
  height: 50%;
  margin-left: 20%;
}

.title {
  font-size: 2rem;
  margin: 2rem 0;
}

.description {
  line-height: 1;
  margin: 2rem 0;
  font-size: 1.2rem;
}

.button {
  border-radius: 4px;
  background-color: blue;
  border: none;
  color: #ffffff;
  font-size: 15px;
  padding: 20px;
  width: 200px;
  cursor: pointer;
  margin-bottom: 2%;
}
@media (max-width: 1000px) {
  .main {
    width: 100%;
    flex-direction: column;
    justify-content: center;
    align-items: center;
  }
}- 在 page 文件夹下打开 index.js 文件并粘贴以下代码,代码说明可以在注释中找到。
import Head from "next/head";
import styles from "../styles/Home.module.css";
import Web3Modal from "web3modal";
import { ethers, providers } from "ethers";
import { useEffect, useRef, useState } from "react";

export default function Home() {
  // walletConnected keep track of whether the user's wallet is connected or not
  const [walletConnected, setWalletConnected] = useState(false);
  // Create a reference to the Web3 Modal (used for connecting to Metamask) which persists as long as the page is open
  const web3ModalRef = useRef();
  // ENS
  const [ens, setENS] = useState("");
  // Save the address of the currently connected account
  const [address, setAddress] = useState("");

  /**
   * Sets the ENS, if the current connected address has an associated ENS or else it sets
   * the address of the connected account
   */
  const setENSOrAddress = async (address, web3Provider) => {
    // Lookup the ENS related to the given address
    var _ens = await web3Provider.lookupAddress(address);
    // If the address has an ENS set the ENS or else just set the address
    if (_ens) {
      setENS(_ens);
    } else {
      setAddress(address);
    }
  };

  /**
   * A `Provider` is needed to interact with the blockchain - reading transactions, reading balances, reading state, etc.
   *
   * A `Signer` is a special type of Provider used in case a `write` transaction needs to be made to the blockchain, which involves the connected account
   * needing to make a digital signature to authorize the transaction being sent. Metamask exposes a Signer API to allow your website to
   * request signatures from the user using Signer functions.
   */
  const getProviderOrSigner = async () => {
    // Connect to Metamask
    // Since we store `web3Modal` as a reference, we need to access the `current` value to get access to the underlying object
    const provider = await web3ModalRef.current.connect();
    const web3Provider = new providers.Web3Provider(provider);

    // If user is not connected to the Rinkeby network, let them know and throw an error
    const { chainId } = await web3Provider.getNetwork();
    if (chainId !== 4) {
      window.alert("Change the network to Rinkeby");
      throw new Error("Change network to Rinkeby");
    }
    const signer = web3Provider.getSigner();
    // Get the address associated to the signer which is connected to  MetaMask
    const address = await signer.getAddress();
    // Calls the function to set the ENS or Address
    await setENSOrAddress(address, web3Provider);
    return signer;
  };

  /*
    connectWallet: Connects the MetaMask wallet
  */
  const connectWallet = async () => {
    try {
      // Get the provider from web3Modal, which in our case is MetaMask
      // When used for the first time, it prompts the user to connect their wallet
      await getProviderOrSigner(true);
      setWalletConnected(true);
    } catch (err) {
      console.error(err);
    }
  };

  /*
    renderButton: Returns a button based on the state of the dapp
  */
  const renderButton = () => {
    if (walletConnected) {
      <div>Wallet connected</div>;
    } else {
      return (
        <button onClick={connectWallet} className={styles.button}>
          Connect your wallet
        </button>
      );
    }
  };

  // useEffects are used to react to changes in state of the website
  // The array at the end of function call represents what state changes will trigger this effect
  // In this case, whenever the value of `walletConnected` changes - this effect will be called
  useEffect(() => {
    // if wallet is not connected, create a new instance of Web3Modal and connect the MetaMask wallet
    if (!walletConnected) {
      // Assign the Web3Modal class to the reference object by setting it's `current` value
      // The `current` value is persisted throughout as long as this page is open
      web3ModalRef.current = new Web3Modal({
        network: "rinkeby",
        providerOptions: {},
        disableInjectedProvider: false,
      });
      connectWallet();
    }
  }, [walletConnected]);

  return (
    <div>
      <Head>
        <title>ENS Dapp</title>
        <meta name="description" content="ENS-Dapp" />
        <link rel="icon" href="/favicon.ico" />
      </Head>
      <div className={styles.main}>
        <div>
          <h1 className={styles.title}>
            Welcome to LearnWeb3 Punks {ens ? ens : address}!
          </h1>
          <div className={styles.description}>
            Its an NFT collection for LearnWeb3 Punks.
          </div>
          {renderButton()}
        </div>
        <div>
          <img className={styles.image} src="./learnweb3punks.png" />
        </div>
      </div>

      <footer className={styles.footer}>
        Made with ❤ by LearnWeb3 Punks
      </footer>
    </div>
  );
}- 现在在指向 my-app 文件夹的终端中,执行
npm run devENS 应用程序现在应该可以正常工作了
推到 Github
在继续之前,请确保已将所有代码推送到 github :)
部署 dApp
我们现在将部署您的 dApp,这样每个人都可以看到您的网站,您可以与您所有的 LearnWeb3DAO 朋友分享它。
-
进入Vercel,用你的GitHub登录
-
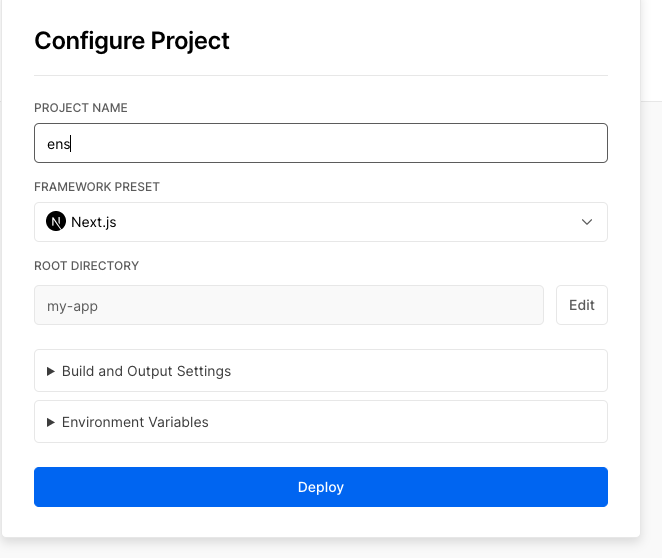
然后点击新建项目按钮,然后选择您的ENS dApp repo

- 在配置你的新项目时,Vercel将允许你定制你的根目录
- 点击根目录旁边的编辑,并将其设置为我的应用程序
- 选择框架为
Next.js - 单击 "部署"。
- 现在,你可以通过进入你的仪表板,选择你的项目,并从那里复制URL,看到你部署的网站
原文: https://www.learnweb3.io/tracks/junior/ethereum-name-service

- 以太坊 2026年协议级更新确定 3 大方向 62 浏览
- 寻找底线:为什么我们为 Layer 2 构建了紧急提款出口( Exit Hatch) 54 浏览
- 后量子时代,我们如何保护隐私 94 浏览
- 为机器人募资:发展agent资本市场 160 浏览
- 如何去中心化构建区块? 237 浏览
- 区块链如何悄然保护你的在线购物体验 282 浏览
- Builder Codes & ERC-8021:修复链上归属问题 277 浏览
- 并行执行的谎言:为什么SOL和ZERO不是在与ETH竞争,而是在输给它的L2 310 浏览
- “夺旗”竞赛继续! 266 浏览
- AI 正热,加密货币遇冷,那又如何? 468 浏览
- EVM Gas 分析:新的执行跟踪数据 280 浏览
- Layer Zero 发布 Zero 链:去中心化的多核世界计算机 296 浏览

