NFT 渲染器
- Jeiwan
- 发布于 2025-10-06 20:57
- 阅读 783
现在我们需要构建一个 NFT 渲染器:一个库,它将处理 NFT 管理器合约中的 tokenURI 调用。它将为每个铸造的 token 渲染 JSON 元数据和一个 SVG。正如我们之前讨论的,我们将使用 data URI 格式,这需要 base64 编码——这意味着我们需要在 Solidity 中使用一个 base64 编码器。但首先,让我们看看我们的 token 会是什么样子。
SVG 模板
我构建了这个 Uniswap V3 NFT 的简化版本:
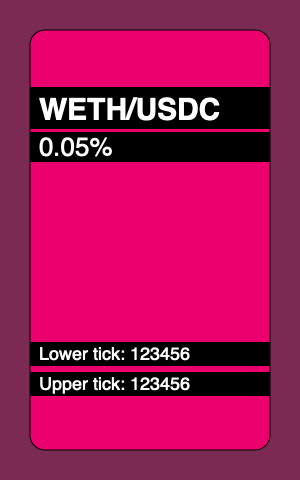
这是它的代码:
<svg xmlns="http://www.w3.org/2000/svg" viewBox="0 0 300 480">
  <style>
    .tokens {
      font: bold 30px sans-serif;
    }

    .fee {
      font: normal 26px sans-serif;
    }

    .tick {
      font: normal 18px sans-serif;
    }
  </style>

  <rect width="300" height="480" fill="hsl(330,40%,40%)" />
  <rect x="30" y="30" width="240" height="420" rx="15" ry="15" fill="hsl(330,90%,50%)" stroke="#000" />

  <rect x="30" y="87" width="240" height="42" />
  <text x="39" y="120" class="tokens" fill="#fff">
    WETH/USDC
  </text>

  <rect x="30" y="132" width="240" height="30" />
  <text x="39" y="120" dy="36" class="fee" fill="#fff">
    0.05%
  </text>

  <rect x="30" y="342" width="240" height="24" />
  <text x="39" y="360" class="tick" fill="#fff">
    Lower tick: 123456
  </text>

  <rect x="30" y="372" width="240" height="24" />
  <text x="39" y="360" dy="30" class="tick" fill="#fff">
    Upper tick: 123456
  </text>
</svg>
这是一个简单的 SVG 模板,我们将创建一个 Solidity 合约,该合约填充此模板中的字段并在 tokenURI 中返回它。每个 token 唯一填充的字段:
- 背景颜色,在头两个
rect中设置;色调分量(模板中的 330)对于每个 token 都是唯一的; - position 所属的池的 token 名称(模板中的 WETH/USDC);
- 池的费用 (0.05%);
- position 边界的 tick 值 (123456)。
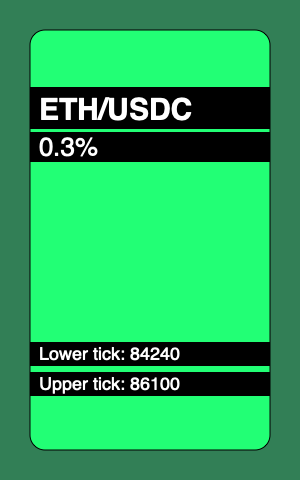
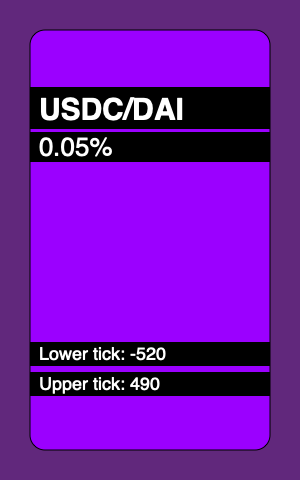
以下是我们的合约将能够生成的 NFT 示例:
依赖项
Solidity 没有提供原生的 Base64 编码工具,因此我们将使用第三方编码工具。具体来说,我们将使用 OpenZeppelin 中的那个。
Solidity 的另一个繁琐之处在于它对字符串的操作支持非常差。例如,无法将整数转换为字符串——但我们需要它来在 SVG 模板中渲染池费用和 position 的 ticks。我们将使用 OpenZeppelin 中的 Strings 库 来做到这一点。
结果的格式
渲染器产生的数据将具有以下格式:
data:application/json;base64,BASE64_ENCODED_JSONJSON 如下所示:
{
  "name": "Uniswap V3 Position",
  "description": "USDC/DAI 0.05%, Lower tick: -520, Upper text: 490",
  "image": "BASE64_ENCODED_SVG"
}
image 将是上面用 position 数据填充并以 Base64 编码的 SVG 模板。
实现渲染器
我们将在一个单独的库合约中实现渲染器,以使 NFT 管理器合约不会过于嘈杂:
library NFTRenderer {
    struct RenderParams {
        address pool;
        address owner;
        int24 lowerTick;
        int24 upperTick;
        uint24 fee;
    }

    function render(RenderParams memory params) {
        ...
    }
}
在 render 函数中,我们将首先渲染一个 SVG,然后渲染一个 JSON。为了使代码更简洁,我们将把每个步骤分解为更小的步骤。
我们从获取 token 符号开始:
function render(RenderParams memory params) {
    IUniswapV3Pool pool = IUniswapV3Pool(params.pool);
    IERC20 token0 = IERC20(pool.token0());
    IERC20 token1 = IERC20(pool.token1());
    string memory symbol0 = token0.symbol();
    string memory symbol1 = token1.symbol();

    ...
SVG 渲染
然后我们可以渲染 SVG 模板:
string memory image = string.concat(
    "<svg xmlns='http://www.w3.org/2000/svg' viewBox='0 0 300 480'>",
    "<style>.tokens { font: bold 30px sans-serif; }",
    ".fee { font: normal 26px sans-serif; }",
    ".tick { font: normal 18px sans-serif; }</style>",
    renderBackground(params.owner, params.lowerTick, params.upperTick),
    renderTop(symbol0, symbol1, params.fee),
    renderBottom(params.lowerTick, params.upperTick),
    "</svg>"
);
该模板分为多个步骤:
- 首先是 header,其中包括 CSS 样式;
- 然后渲染背景;
- 然后渲染顶部位置信息(token 符号和费用);
- 最后,渲染底部信息(position 的 ticks)。
背景只是两个 rect。为了渲染它们,我们需要找到此 token 的唯一色调,然后将所有片段连接在一起:
function renderBackground(
    address owner,
    int24 lowerTick,
    int24 upperTick
) internal pure returns (string memory background) {
    bytes32 key = keccak256(abi.encodePacked(owner, lowerTick, upperTick));
    uint256 hue = uint256(key) % 360;

    background = string.concat(
        '<rect width="300" height="480" fill="hsl(',
        Strings.toString(hue),
        ',40%,40%)"/>',
        '<rect x="30" y="30" width="240" height="420" rx="15" ry="15" fill="hsl(',
        Strings.toString(hue),
        ',100%,50%)" stroke="#000"/>'
    );
}
顶部模板渲染 token 符号和池费用:
function renderTop(
    string memory symbol0,
    string memory symbol1,
    uint24 fee
) internal pure returns (string memory top) {
    top = string.concat(
        '<rect x="30" y="87" width="240" height="42"/>',
        '<text x="39" y="120" class="tokens" fill="#fff">',
        symbol0,
        "/",
        symbol1,
        "</text>"
        '<rect x="30" y="132" width="240" height="30"/>',
        '<text x="39" y="120" dy="36" class="fee" fill="#fff">',
        feeToText(fee),
        "</text>"
    );
}
费用呈现为带有小数部分的数字。由于所有可能的费用都是预先知道的,因此我们不需要将整数转换为小数,而可以简单地对值进行硬编码:
function feeToText(uint256 fee)
    internal
    pure
    returns (string memory feeString)
{
    if (fee == 500) {
        feeString = "0.05%";
    } else if (fee == 3000) {
        feeString = "0.3%";
    }
}
在底部,我们渲染 position 的 ticks:
function renderBottom(int24 lowerTick, int24 upperTick)
    internal
    pure
    returns (string memory bottom)
{
    bottom = string.concat(
        '<rect x="30" y="342" width="240" height="24"/>',
        '<text x="39" y="360" class="tick" fill="#fff">Lower tick: ',
        tickToText(lowerTick),
        "</text>",
        '<rect x="30" y="372" width="240" height="24"/>',
        '<text x="39" y="360" dy="30" class="tick" fill="#fff">Upper tick: ',
        tickToText(upperTick),
        "</text>"
    );
}
由于 ticks 可以是正数和负数,因此我们需要正确地渲染它们(带或不带减号):
function tickToText(int24 tick)
    internal
    pure
    returns (string memory tickString)
{
    tickString = string.concat(
        tick < 0 ? "-" : "",
        tick < 0
            ? Strings.toString(uint256(uint24(-tick)))
            : Strings.toString(uint256(uint24(tick)))
    );
}
JSON 渲染
现在,让我们回到 render 函数并渲染 JSON。首先,我们需要渲染 token 描述:
function render(RenderParams memory params) {
    ... SVG rendering ...

    string memory description = renderDescription(
        symbol0,
        symbol1,
        params.fee,
        params.lowerTick,
        params.upperTick
    );

    ...
token 描述是一个文本字符串,其中包含我们在 token 的 SVG 中呈现的所有相同信息:
function renderDescription(
    string memory symbol0,
    string memory symbol1,
    uint24 fee,
    int24 lowerTick,
    int24 upperTick
) internal pure returns (string memory description) {
    description = string.concat(
        symbol0,
        "/",
        symbol1,
        " ",
        feeToText(fee),
        ", Lower tick: ",
        tickToText(lowerTick),
        ", Upper text: ",
        tickToText(upperTick)
    );
}
我们现在可以组装 JSON 元数据:
function render(RenderParams memory params) {
    string memory image = ...SVG rendering...
    string memory description = ...description rendering...

    string memory json = string.concat(
        '{"name":"Uniswap V3 Position",',
        '"description":"',
        description,
        '",',
        '"image":"data:image/svg+xml;base64,',
        Base64.encode(bytes(image)),
        '"}'
    );
最后,我们可以返回结果:
return
    string.concat(
        "data:application/json;base64,",
        Base64.encode(bytes(json))
    );
填补 tokenURI 中的空白
现在我们准备好返回 NFT 管理器合约中的 tokenURI 函数并添加实际渲染:
function tokenURI(uint256 tokenId)
    public
    view
    override
    returns (string memory)
{
    TokenPosition memory tokenPosition = positions[tokenId];
    if (tokenPosition.pool == address(0x00)) revert WrongToken();

    IUniswapV3Pool pool = IUniswapV3Pool(tokenPosition.pool);

    return
        NFTRenderer.render(
            NFTRenderer.RenderParams({
                pool: tokenPosition.pool,
                owner: address(this),
                lowerTick: tokenPosition.lowerTick,
                upperTick: tokenPosition.upperTick,
                fee: pool.fee()
            })
        );
}
Gas 成本
凭借其所有优势,在链上存储数据有一个巨大的缺点:合约部署变得非常昂贵。部署合约时,您需要为合约的大小付费,并且所有字符串和模板都会大大增加 gas 的支出。您的 SVG 越高级,情况就越糟:形状、CSS 样式、动画等越多,成本就越高。
请记住,我们上面实现的 NFT 渲染器没有进行 gas 优化:您可以看到重复的 rect 和 text tag 字符串可以提取到内部函数中。我牺牲了 gas 效率来提高合约的可读性。在链上存储所有数据的真实 NFT 项目中,由于大量的 gas 成本优化,代码可读性通常非常差。
测试
我想在这里重点关注的最后一件事是我们如何测试 NFT 图像。跟踪 NFT 图像中的所有更改以确保没有更改破坏渲染非常重要。为此,我们需要一种测试 tokenURI 及其不同变体输出的方法(我们甚至可以预先渲染整个集合并进行测试以确保在开发过程中没有图像被破坏)。
为了测试 tokenURI 的输出,我添加了这个自定义断言:
assertTokenURI(
    nft.tokenURI(tokenId0),
    "tokenuri0",
    "invalid token URI"
);
第一个参数是实际输出,第二个参数是存储预期输出的文件名。该断言加载文件的内容并将其与实际内容进行比较:
function assertTokenURI(
    string memory actual,
    string memory expectedFixture,
    string memory errMessage
) internal {
    string memory expected = vm.readFile(
        string.concat("./test/fixtures/", expectedFixture)
    );

    assertEq(actual, string(expected), errMessage);
}
这多亏了 forge-std 库提供的 vm.readFile() 作弊码,我们可以在 Solidity 中做到这一点,forge-std 库是 Forge 附带的 helper 库。这不仅简单方便,而且还安全:我们可以配置文件系统权限以仅允许允许的文件操作。具体来说,为了使上面的测试有效,我们需要将此 fs_permissions 规则添加到 foundry.toml 中:
fs_permissions = [{access='read',path='.'}]这就是您可以从 tokenURI fixture 中读取 SVG 的方法:
$ cat test/fixtures/tokenuri0 \
    | awk -F ',' '{print $2}' \
    | base64 -d - \
    | jq -r .image \
    | awk -F ',' '{print $2}' \
    | base64 -d - > nft.svg \
    && open nft.svg
确保您已安装 jq tool。


