Web3 实战:解锁 Monad MCP,轻松查询 MON 余额
- 寻月隐君
- 发布于 2025-05-07 10:13
- 阅读 2304
Web3实战:解锁MonadMCP,轻松查询MON余额在Web3浪潮席卷全球的今天,Monad作为高性能Layer1区块链,正以其高效的交易处理能力和开发者友好的生态吸引着无数目光。ModelContextProtocol(MCP)作为Monad的重要工具,为开发者提
Web3 实战:解锁 Monad MCP,轻松查询 MON 余额
在 Web3 浪潮席卷全球的今天,Monad 作为高性能 Layer 1 区块链,正以其高效的交易处理能力和开发者友好的生态吸引着无数目光。Model Context Protocol(MCP)作为 Monad 的重要工具,为开发者提供了与区块链交互的便捷方式。本文将带你走进 Web3 实战,通过一步步的教程解锁 Monad MCP 的潜力,轻松搭建服务器并实现 MON 代币余额查询。无论你是区块链新手还是资深开发者,这篇指南都将为你打开 Monad 生态的大门,激发 Web3 开发的无限可能!
本文通过详尽的实操教程,展示了如何基于 Monad 的 Model Context Protocol(MCP)搭建一个与 Monad 测试网交互的服务器,轻松实现 MON 代币余额查询功能。从克隆 monad-mcp-tutorial 项目、安装依赖、配置环境,到编写核心代码和集成 Cursor、Windsurf 等工具,本文覆盖了从零到一的完整流程。教程以清晰的步骤和代码解析,结合 Web3 开发的实际场景,帮助读者快速掌握 Monad MCP 的核心技能。无论你是想探索 Web3 技术的前沿,还是希望为 Monad 生态贡献代码,这篇实战指南都将是你不容错过的起点。
MCP 入门及
MCP 在 Monad 上的实战
MCP 是一种开放协议,旨在实现大型语言模型(LLM)应用程序与外部数据源和工具之间的无缝集成。MCP作为一个框架的核心价值,即推动LLM与外部资源的集成,以满足开发者的实际使用需求。通过提供标准化的连接方式,MCP使得各类应用程序能够更好地利用LLM的强大功能,从而提升整体的工作效率和用户体验。Model Context Protocol (MCP) 是一个公开的协议,它的作用是帮助大型语言模型(LLM)应用和外部数据源、工具之间实现无缝连接。MCP就像一个万能接口,解决了传统系统和AI工具之间难以交流的问题。无论你是想提高效率、增加功能,还是开发全新应用,MCP都能帮你打通数据与AI的壁垒,让一切更加智能和高效。

实操
克隆项目并用cursor 打开
Clone the monad-mcp-tutorial repository.
cd Code/Monad/
ls
Monad-101-Bootcamp MonadArt           buyearth           scaffold-eth-monad
git clone https://github.com/monad-developers/monad-mcp-tutorial.git
Cloning into 'monad-mcp-tutorial'...
remote: Enumerating objects: 86, done.
remote: Counting objects: 100% (44/44), done.
remote: Compressing objects: 100% (24/24), done.
remote: Total 86 (delta 26), reused 25 (delta 20), pack-reused 42 (from 1)
Receiving objects: 100% (86/86), 44.37 MiB | 16.23 MiB/s, done.
Resolving deltas: 100% (41/41), done.
cd monad-mcp-tutorial
ls
README-CN.md      README.md         package-lock.json package.json      src               static            tsconfig.json
cc
安装项目依赖
pnpm install 会根据项目中的 package.json 文件,安装所有列出的依赖(包括 dependencies 和 devDependencies)。
monad-mcp-tutorial on main is 📦 1.0.0 via ⬢ v23.11.0
➜ # 删除锁定文件
rm package-lock.json
# 清理 npm 缓存(可选)
npm cache clean --force
# 删除 node_modules(避免残留)
rm -rf node_modules
npm warn using --force Recommended protections disabled.
monad-mcp-tutorial on main [✘] is 📦 1.0.0 via ⬢ v23.11.0
➜ pnpm install
╭─────────────────────────────────────────╮
│ │
│ Update available! 10.8.1 → 10.9.0. │
│ Changelog: https://pnpm.io/v/10.9.0 │
│ To update, run: pnpm self-update │
│ │
╰─────────────────────────────────────────╯
Packages: +107
+++++++++++++++++++++++++++++++++++++++++++++++++++++++++++++++++++++++++++++++++++++++++++++++++++++++++++
Progress: resolved 107, reused 14, downloaded 93, added 107, done
dependencies:
+ @modelcontextprotocol/sdk 1.10.2
+ axios 1.8.4
+ typescript 5.8.3
+ viem 2.28.0
+ zod 3.24.3
devDependencies:
+ @types/node 22.14.1
Done in 4.3s using pnpm v10.8.1
项目目录
monad-mcp-tutorial on main [✘!?] is 📦 1.0.0 via ⬢ v23.11.0 took 2.1s
➜ tree . -L 6 -I "node_modules"
.
├── build
│ └── index.js
├── package.json
├── pnpm-lock.yaml
├── README-CN.md
├── README.md
├── src
│ └── index.ts
├── static
│ ├── 1.png
│ ├── claude_settings.gif
│ ├── config.gif
│ ├── final_result.gif
│ └── tools.gif
└── tsconfig.json
4 directories, 12 files
src/index.ts 文件
/**
 * Monad MCP Tutorial
 *
 * This file demonstrates how to create a Model Context Protocol (MCP) server
 * that interacts with the Monad blockchain testnet to check MON balances.
 */

// Import necessary dependencies
import { McpServer } from "@modelcontextprotocol/sdk/server/mcp.js";
import { StdioServerTransport } from "@modelcontextprotocol/sdk/server/stdio.js";
import { z } from "zod";
import { createPublicClient, formatUnits, http } from "viem";
import { monadTestnet } from "viem/chains";

// Create a public client to interact with the Monad testnet
const publicClient = createPublicClient({
    chain: monadTestnet,
    transport: http(),
});

// Initialize the MCP server with a name, version, and capabilities
// 初始化 MCP 服务器
const server = new McpServer({
    name: "monad-testnet",
    version: "0.0.1",
    // 定义服务器支持的功能列表
    capabilities: ["get-mon-balance"]
});

// Define a tool that gets the MON balance for a given address
server.tool(
    // 功能标识符
    "get-mon-balance",
    // 功能说明
    "查询 Monad 测试网地址的 MON 代币余额",
    // 参数定义
    {
        address: z.string().describe("需要查询的 Monad 测试网地址"),
    },
    // 功能实现
    async ({ address }) => {
        try {
            // 调用接口查询余额
            const balance = await publicClient.getBalance({
                address: address as `0x${string}`,
            });

            // 返回格式化的查询结果
            return {
                content: [
                    {
                        type: "text",
                        text: `地址 ${address} 的 MON 余额为:${formatUnits(balance, 18)} MON`,
                    },
                ],
            };
        } catch (error) {
            // 错误处理
            return {
                content: [
                    {
                        type: "text",
                        text: `查询地址 ${address} 的余额失败:${error instanceof Error ? error.message : String(error)
                            }`,
                    },
                ],
            };
        }
    }
);

/**
 * Main function to start the MCP server
 * Uses stdio for communication with LLM clients
 */
async function main() {
    // Create a transport layer using standard input/output
    // 配置标准输入输出作为通信通道
    const transport = new StdioServerTransport();

    // Connect the server to the transport
    // 建立服务器连接
    await server.connect(transport);

    console.error("Monad 测试网 MCP 服务器已启动");
    console.error("Monad testnet MCP Server running on stdio");
}

// Start the server and handle any fatal errors
main().catch((error) => {
    console.error("Fatal error in main():", error);
    process.exit(1);
});
项目构建
monad-mcp-tutorial on main [✘!?] is 📦 1.0.0 via ⬢ v23.11.0
➜ pnpm build
> monad-mcp-tutorial@1.0.0 build /Users/qiaopengjun/Code/Monad/monad-mcp-tutorial
> tsc && chmod 755 build/index.js
build/index.js 文件
"use strict";
/**
 * Monad MCP Tutorial
 *
 * This file demonstrates how to create a Model Context Protocol (MCP) server
 * that interacts with the Monad blockchain testnet to check MON balances.
 */
Object.defineProperty(exports, "__esModule", { value: true });
// Import necessary dependencies
const mcp_js_1 = require("@modelcontextprotocol/sdk/server/mcp.js");
const stdio_js_1 = require("@modelcontextprotocol/sdk/server/stdio.js");
const zod_1 = require("zod");
const viem_1 = require("viem");
const chains_1 = require("viem/chains");
// Create a public client to interact with the Monad testnet
const publicClient = (0, viem_1.createPublicClient)({
    chain: chains_1.monadTestnet,
    transport: (0, viem_1.http)(),
});
// Initialize the MCP server with a name, version, and capabilities
// 初始化 MCP 服务器
const server = new mcp_js_1.McpServer({
    name: "monad-testnet",
    version: "0.0.1",
    // 定义服务器支持的功能列表
    capabilities: ["get-mon-balance"]
});
// Define a tool that gets the MON balance for a given address
server.tool(
// 功能标识符
"get-mon-balance",
// 功能说明
"查询 Monad 测试网地址的 MON 代币余额",
// 参数定义
{
    address: zod_1.z.string().describe("需要查询的 Monad 测试网地址"),
},
// 功能实现
async ({ address }) => {
    try {
        // 调用接口查询余额
        const balance = await publicClient.getBalance({
            address: address,
        });
        // 返回格式化的查询结果
        return {
            content: [
                {
                    type: "text",
                    text: `地址 ${address} 的 MON 余额为:${(0, viem_1.formatUnits)(balance, 18)} MON`,
                },
            ],
        };
    }
    catch (error) {
        // 错误处理
        return {
            content: [
                {
                    type: "text",
                    text: `查询地址 ${address} 的余额失败:${error instanceof Error ? error.message : String(error)}`,
                },
            ],
        };
    }
});
/**
 * Main function to start the MCP server
 * Uses stdio for communication with LLM clients
 */
async function main() {
    // Create a transport layer using standard input/output
    // 配置标准输入输出作为通信通道
    const transport = new stdio_js_1.StdioServerTransport();
    // Connect the server to the transport
    // 建立服务器连接
    await server.connect(transport);
    console.error("Monad 测试网 MCP 服务器已启动");
    console.error("Monad testnet MCP Server running on stdio");
}
// Start the server and handle any fatal errors
main().catch((error) => {
    console.error("Fatal error in main():", error);
    process.exit(1);
});
在 Cursor Settings 中点击 Add new global MCP server 打开 mcp.json文件
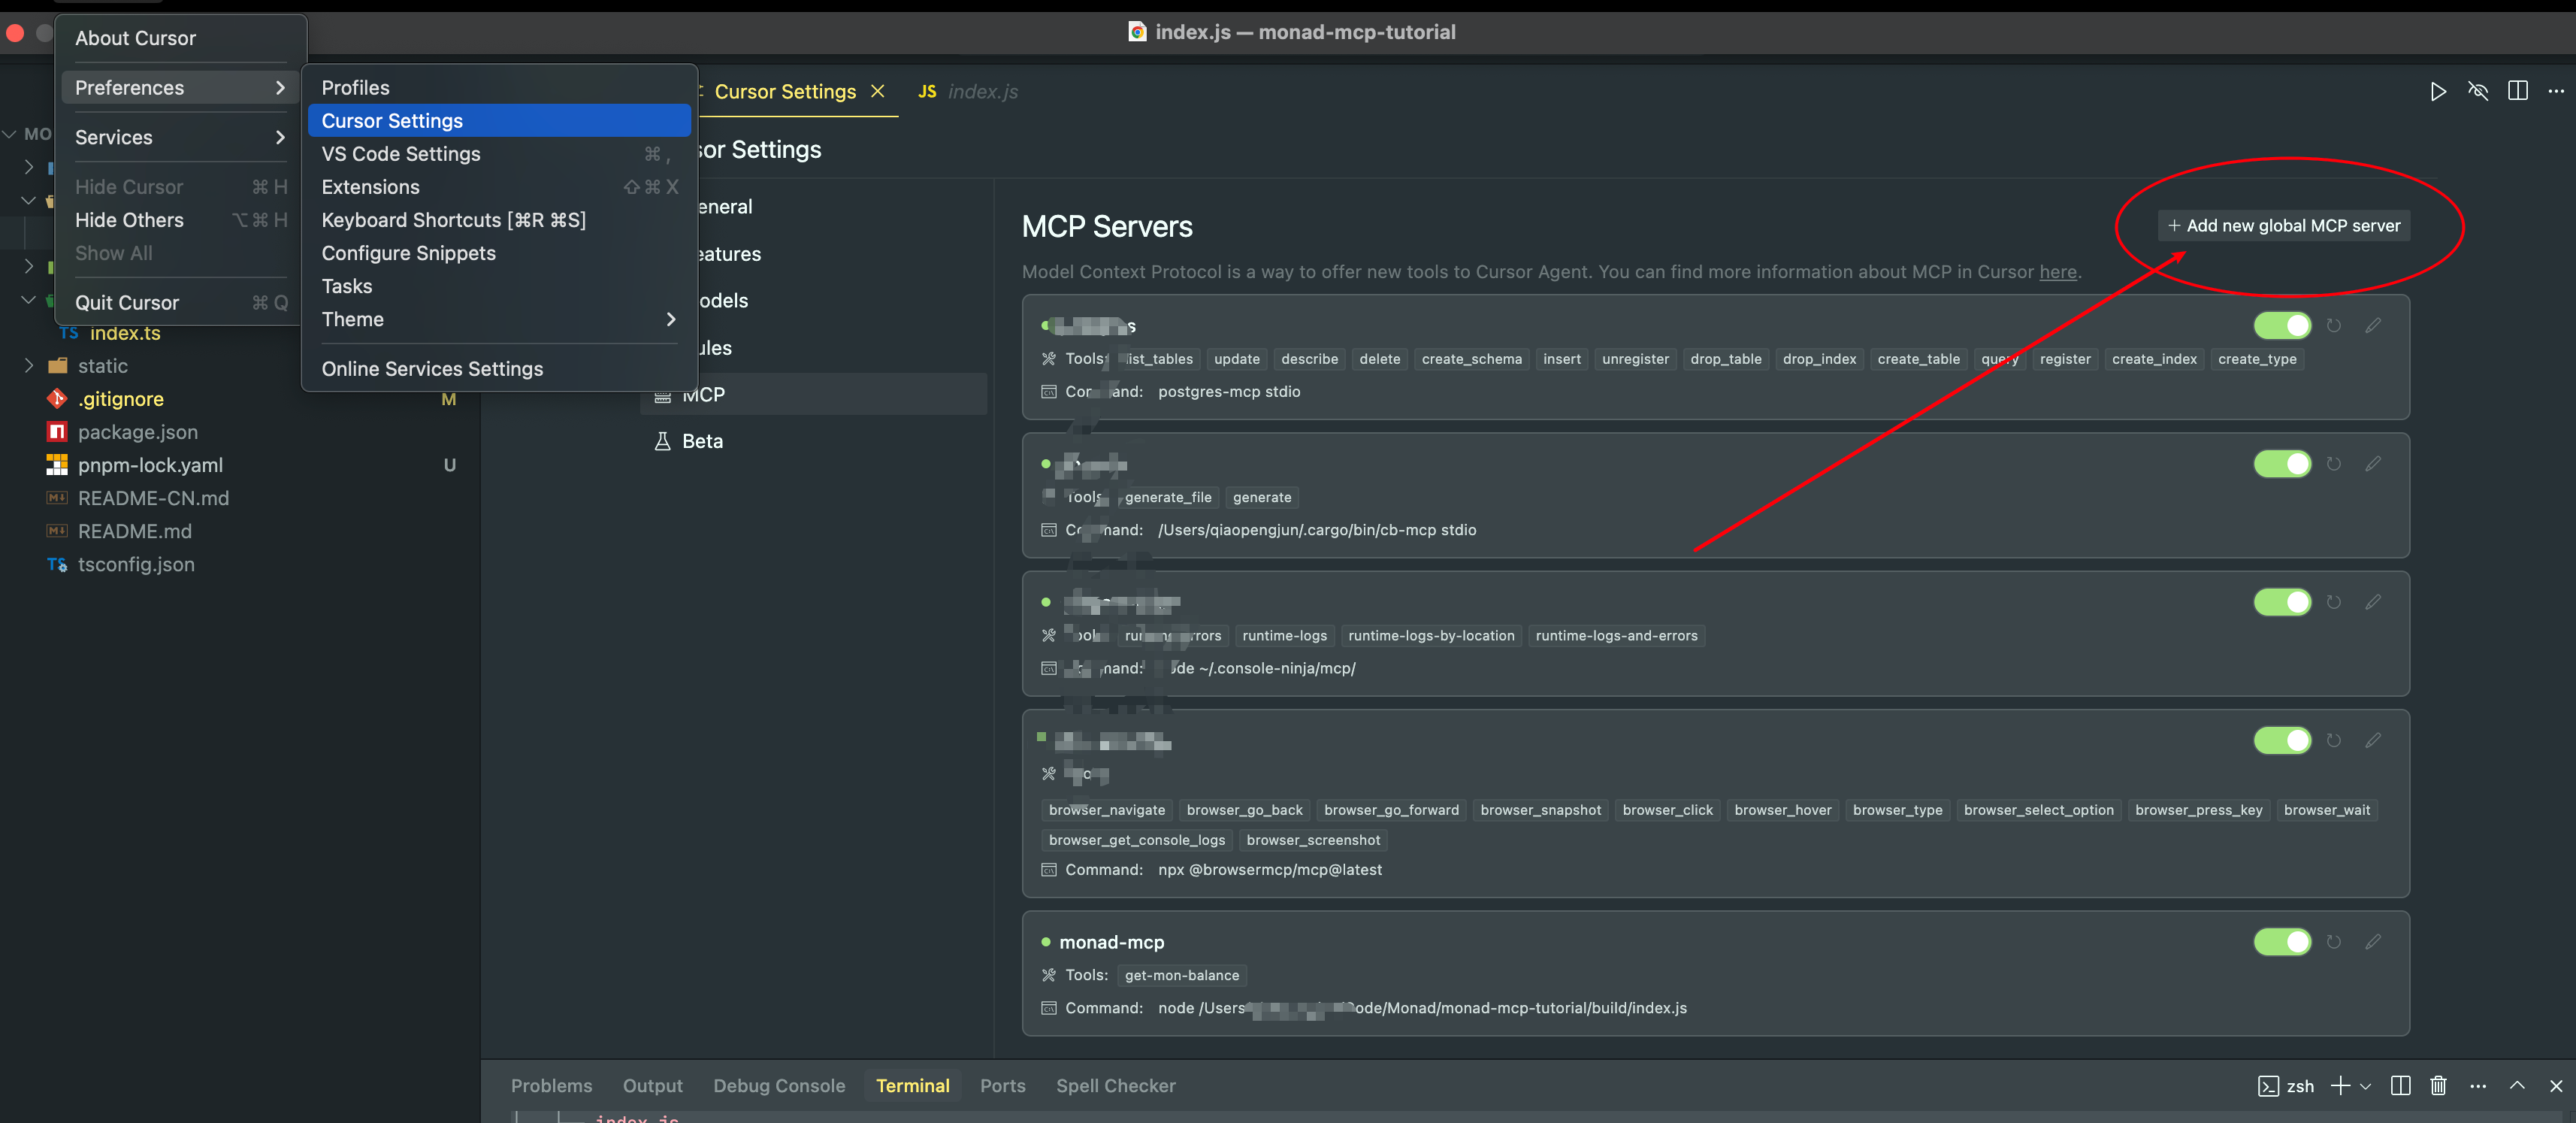
在 mcp.json 文件中添加服务器配置并保存
{
  "mcpServers": {
    ...
    "monad-mcp": {
      "command": "node",
      "args": [
        "/<项目路径>/build/index.js"
      ]
    }
  }
}
启动 MCP 服务
monad-mcp-tutorial on main [✘!?] is 📦 1.0.0 via ⬢ v23.11.0
➜ node /Users/qiaopengjun/Code/Monad/monad-mcp-tutorial/build/index.js
Monad 测试网 MCP 服务器已启动
Monad testnet MCP Server running on stdio
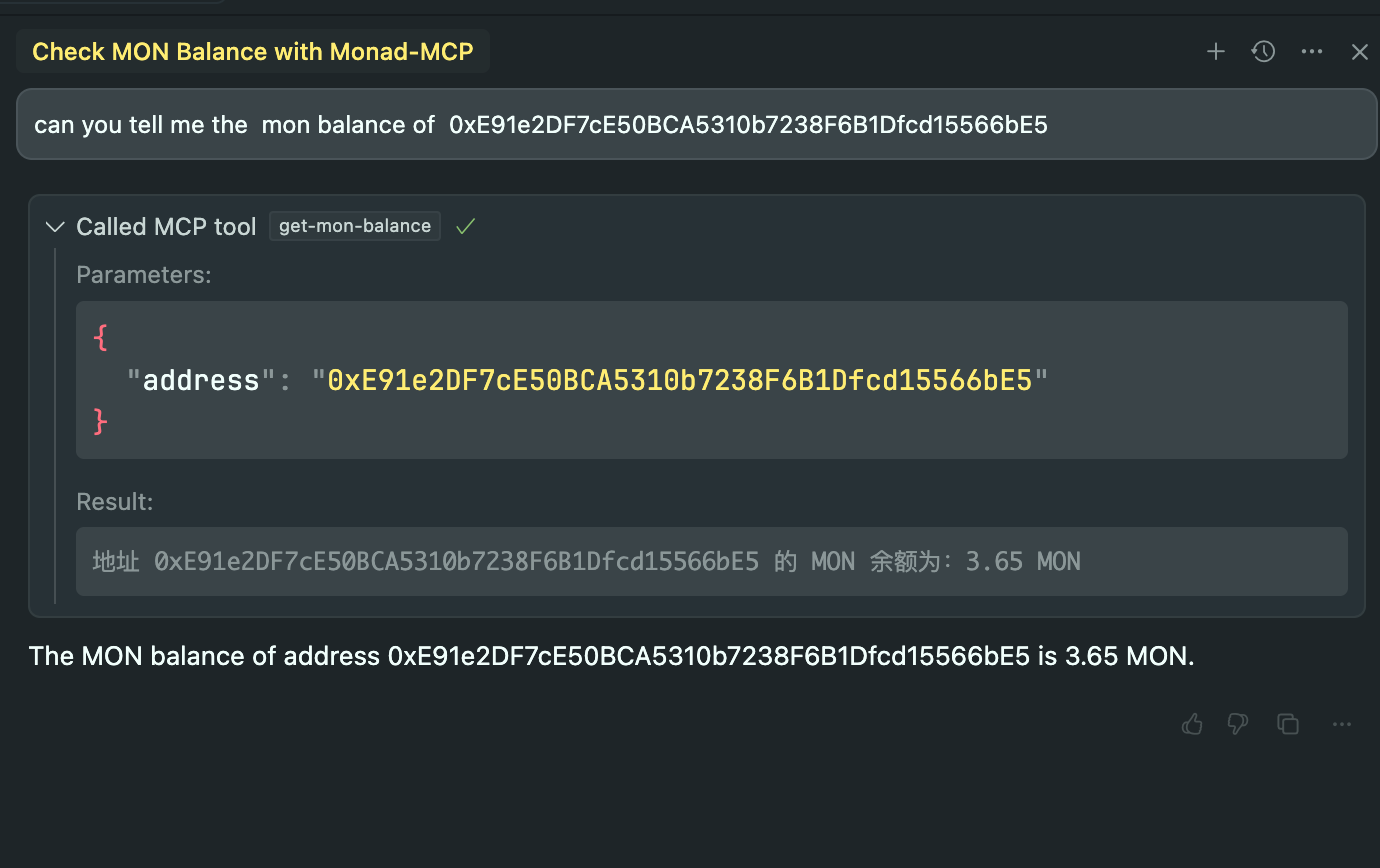
Cursor 使用示例
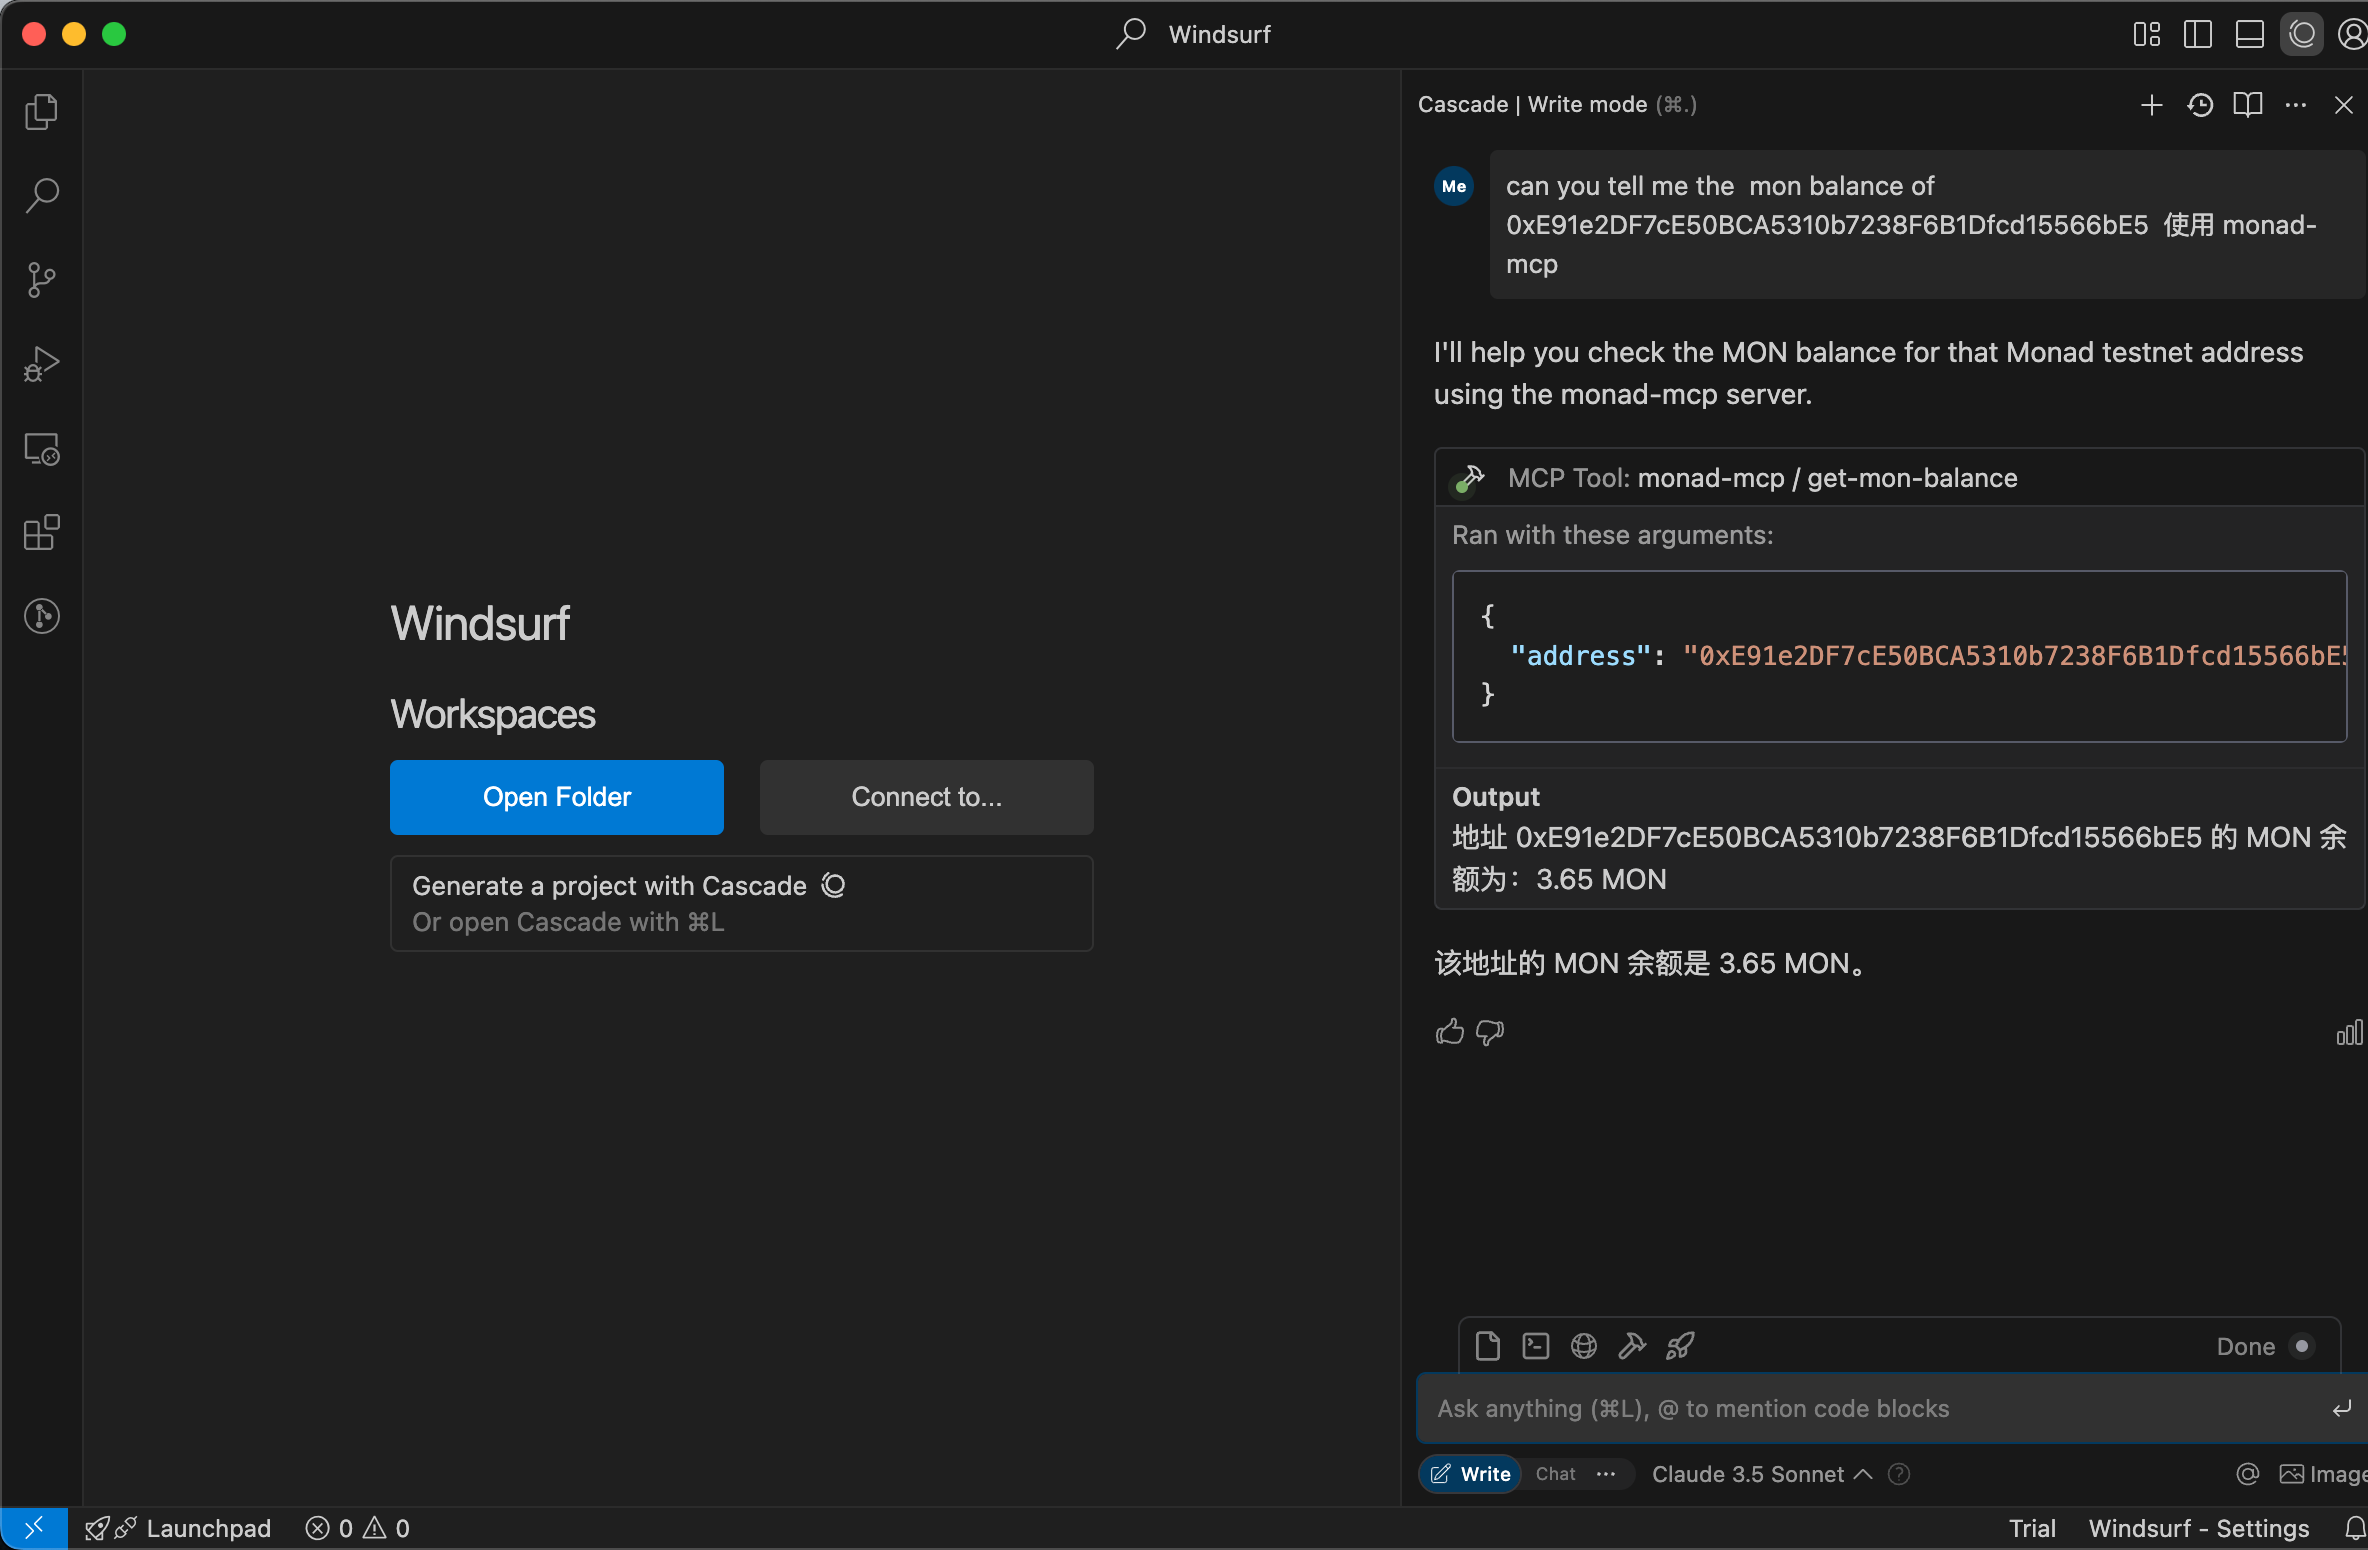
Windsurf 使用示例
总结
通过本教程,你已成功解锁 Monad MCP 的核心技能,从克隆项目到搭建服务器,再到实现 MON 余额查询,全面体验了 Web3 开发的魅力。Monad 的高性能区块链特性和 MCP 的灵活性,为开发者提供了广阔的创新空间。本文不仅提供了实操步骤和代码解析,还展示了如何通过 Cursor 和 Windsurf 等工具提升开发效率。未来,你可以基于此基础进一步探索 Monad 生态中的智能合约、DApp 开发等前沿领域。立即行动,借助 Monad 和 Web3 的东风,开启你的区块链开发之旅!更多资源和社区支持,尽在参考链接中等待你的发现。


